On a standard guitar rig you have a myriad of ways to change the volume that ends up coming out of the amp. The volume knob on a guitar, a volume pedal on the pedal board, the volume or gain knob on the amp, and finally a master volume (and sometimes even another master volume as we’ll get to), are all possible to see in a normal setup. All of these “volume” knobs work in different ways and should be understood to get optimal tone out of your amplifier.
Table of Contents
Article Summary
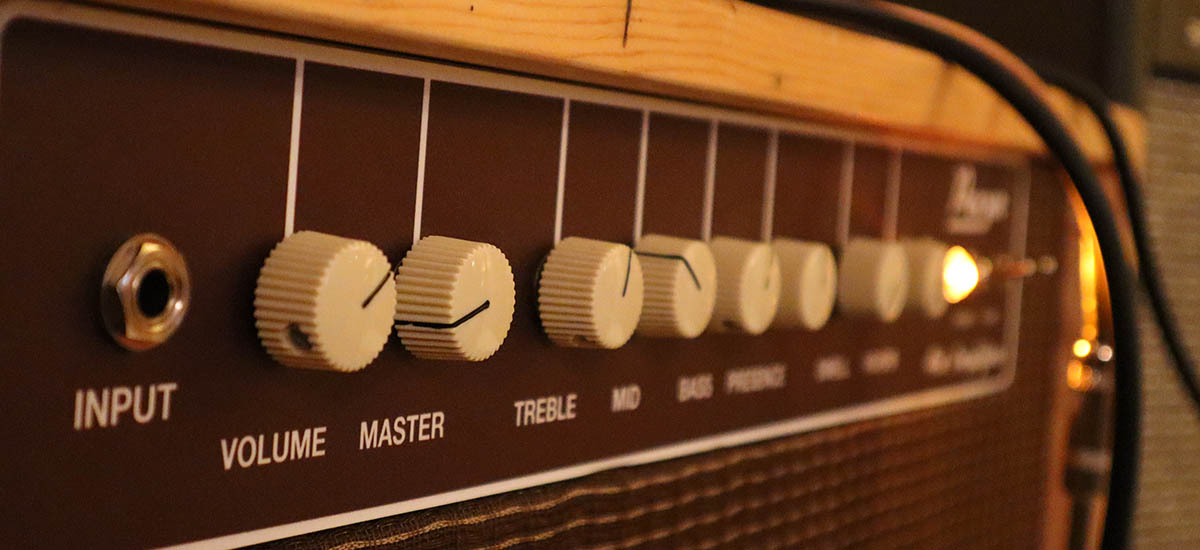
On a guitar amplifier, GAIN controls the level of amplification through the preamp section. If no other volume knob exists on the amp, this acts as the “master” volume. Sometimes GAIN is labeled as VOLUME and the MASTER VOLUME is labeled as MASTER. A common phrasing on Fender amps and can be found on the Blues Jr.
MASTER VOLUME controls occur later in the amp topology prior to, or after the phase inverter (in a class A/B amplifier), and work to limit the final volume coming from the amp. When an amp has two volume knobs like this, the first VOLUME is most often used to dial in preamp stage distortion while the MASTER is used to control overall volume. Master Volumes however, change the tone of an amplifier and often don’t allow the power section to overdrive which is where a lot of secret buttery tones live in an amp.
ATTENUATORS are used after the power amp and output transformer and before the speaker. This acts as a final MASTER VOLUME allowing the amp’s power section to provide the sweet buttery goodness it was built for while keeping the amp at a reasonable volume that doesn’t make ears bleed.
Preample (Get it? Like preamble. I know… I know.)
We understand gain structures and volume definitions in terms of the analog technology that started this whole amplified music thing back in the day. The terms we use, and how we use them are all based around tube amps of the 40s and 50s.
These days, digital tech is beginning to create its own definitions of long used terminology based on new designs, evolving sounds, and technical ability.
This article is going to use the definitions of volume and gain as if we’re all talking about an analogue tube amplifier. Knowing that there are exceptions to these rules, well that’s what Rock and Roll is about isn’t it?
Gain, a Rock and Roll Love Story
When the first guitar amplifiers came onto the scene in the late ‘20s and ‘30s they were initially intended for more of a PA application. Electronics companies weren’t trying to create walls of guitar sound just yet.
Early amplifiers had limited tone and frequency response, and most were just getting the ability to plug into an AC wall outlet. Before that they ran off of heavy battery packs!
Later in the ‘50s and ‘60s, musicians began experimenting with exploiting one of the technical drawbacks of vacuum tube amplification. As volume increases, the original guitar signal becomes increasingly deformed by the tube’s inability to amplify a signal perfectly. These deformations of signal are called distortion, and this distortion changed music, and guitar playing, forever.
As players found that an overdriven preamp section into a larger, turned down power amp resulted in more distortion at a lower volume, Master Volume knobs started showing up on guitar amplifiers. Mesa Boogie, Dumble, Marshall these were names associated with the early days of higher gain amplifiers.
Distortion Vs. Overdrive
In modern guitar player vernacular, distortion refers to an overdriven preamp while overdrive refers to an overdriven power amp.
Let’s break this down further. I know, this is a bit confusing.
Distortion is often characterized by words like fuzz, crunch, gain, etc. Distortion takes a guitar’s sound and turns it into a meat grinder. Distortion is mean, in your face, and defines Rock and Roll.
Distortion is achieved by pushing preamp tubes until they can no longer accurately reproduce the input signal.
Overdrive on the other hand is characterized by words like smooth, buttery, sweet singing tone, and occurs when power tubes no longer accurately amplify the input signal.
I’m going to pull some definitions from Merlin Blencowe’s Designing Tube Preamps for Guitar and Bass which is a must have book on the shelf for any guitar player wishing to get into tube amp work or building.

This is the best book I’ve ever read on guitar tube amp design, BUY ON AMAZON
Distortion – refers mainly to the heavier square-wave sound or crunchy sound caused by heavy clipping.
Overdrive – refers to driving a valve to the point of visible clipping, and to the mild or moderate ‘engine sound’ it creates.
Designing Tube Preamps for Guitar and Bass, page 249.
Engine sound? I’m not exactly sure what Merlin means here, but overdrive occurs when a tube’s output begins to clip, or get squished from its original shape. Here’s what that actually looks like
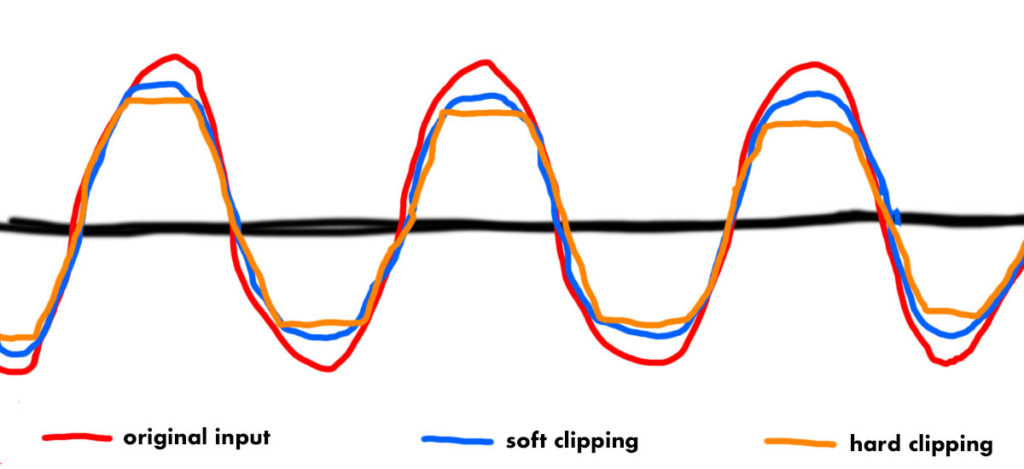
Here we see what is called soft clipping occuring. This is where the top of the sign wave gets cut off in smooth, rounded waves. This generates a mild and warm compressed tone that sounds pleasing to the ear.
On the other side you can clearly see the hard clipping which results in the crunchy sound that characterizes distortion. It is the hard corners in the sine wave that create this distorted sound we know and love.
The characteristics of overdriven tubes have been emulated by guitar pedals in a similar fashion. For instance, the BOSS DS-1 Distortion pedal we all have floating around somewhere is designed to hard clip and create a smooth distortion similar to pushing preamp tubes past their limits.
The BOSS SD-1 Super Overdrive on the other hand is a circuit that seeks to mimic the buttery overdrive created through the soft clipping that occurs in overdriven power tubes.
GAIN, VOLUME, And MASTER Settings for Your Guitar Amp
Back to the guitar amp now, let’s take a look at what some different settings will produce.
I’m using a hand-wired 40watt tube amp that is inspired by the Fender Vibrolux with a handful of unique improvements.
Now, the Fender Vibrolux never had a Master Volume. The only volume on that amp was the first volume on the left of this one. This controls the output of the first preamp tube and allows (or doesn’t) signal to continue on to the tone stack, further preamp stages, and lastly the power amplification stage.
This amplifier has a post phase inverter master volume which allows the full character of the amp, including the phase inverter, to be created and then attenuating that before sending it to the power tubes. This is a common design and will demonstrate common sounds for different amp configurations.
Clean Setting
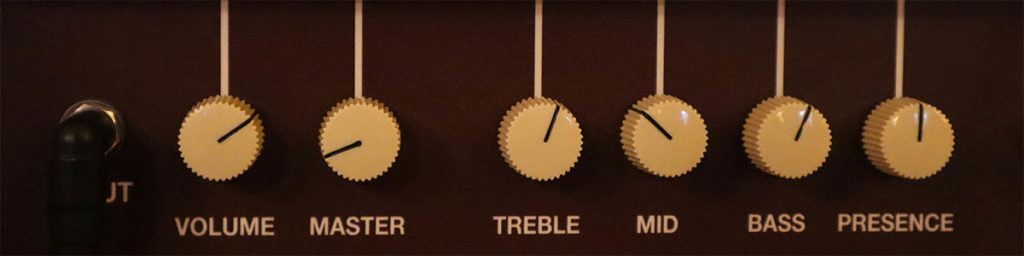
First, we’ll turn the volume knob all the way down (to save our ears) and turn the master volume all the way up. This takes the master volume out of the circuit as much as possible. There are downsides to a Master Volume control, and this is one of them. No matter how far up you turn a master volume knob, which should pull the control out of the circuit as much as possible, there will always be a bit of tone bleed.
So with the Master all the way up we can slowly start bringing in the volume knob. This is the configuration to get the cleanest tone possible in any amp, and highlights the amp’s headroom.
Distorted Setting
By turning the Master Volume down, we can now get the full distortion of the preamp stages. Turn up the master to about 1 or 2 and then slowly roll in the Volume. Bring the Volume up to about 7 or 8, and with the master turned down you should hear some pretty extreme distortion.
Now, this distortion to me doesn’t sound the best. As mentioned above, distortion from preamp tubes occurs in a very clipped fashion which can come across as harsh and crunchy. While that is the sound some guitar players are trying to achieve, it typically leaves me wanting more warmth in my tone.
Finding the Right Combination of Gain and Master Volume

For a nice bluesy, slightly driven tone, I like to run the master volume at about 5 and then roll in the volume or gain knob until I hear the amount of dirt I want. Control the overall volume of the amp with the Master Volume, and control the amount of distortion with the Volume knob. These two controls are linked, so you’ll have to readjust one control after setting the other. This might take a handful of tweaks to get it just right, but in the end you should be able to dial in just the exact amount of dirt you want out of your amplifier.
There are a wide range of tones available from just playing with these two knobs. Take your time and find the sound that works the best for the style of music you’re playing.
Pre vs. Post Phase Inverter Master Volumes
I’m not going to go into depth on this topic in this article, but know that there are gigabytes of forum discussions out there about what sounds better, a Pre-phase inverter master volume or a post-phase inverter master volume.
Without actual frequency response graphs or other hard data I have no desire to make statements about the quality of tone or sound of one vs the other. Just know that no matter where you put a master volume control, another component meant to lower volume will always have an overall effect on the sound and tone of an amp no matter what the dial is set to.
The Post-Master Volume, Master Volume
There is still an issue that we haven’t discussed. If an amp’s mojo and sweet, glorious overdriven tone comes from the soft clipping of the power tubes in overdrive than a pre-power tube volume control like we’ve been talking about does nothing to tap into that treasure chest.
This is true, and this is an important point that all guitar players should understand. A Master Volume is cutting the volume of your preamp section before sending it to the power tubes for final amplification.
So why don’t we just put the volume control after the power tubes? The voltage after the power tube stage is typically around 100v. From there it goes into the output transformer which changes the high voltage, low amperage signal to a low voltage, high amperage signal necessary for powering a speaker.
Something has to dissipate, or absorb all the excess energy coming out of those power tubes, and a typical volume control simply can’t do that. You’d fry a pot faster than you could pull the cord out of the wall.
Instead we need an attenuator which sits between the output transformer and the speaker. It takes the excess energy that we don’t want turned into volume and safely dissipates it.
Attenuators have come along way, and have been getting incredibly advanced lately. For a simple attenuator, take a look at the Dr. Z Z-Brake which comes in at about $250. It contains 4 different levels of attenuation, dampening the overall output of the amp while still retaining the goodness that comes from the power tubes and output transformer.
These types of attenuators are simple high load resistors that have the ability to dissipate electrical power as heat. The downside of this solution is that it has a fixed load. A speaker in real life scenarios has a varying load depending on the frequencies and velocity of notes being pushed through it. For this reason, varying load attenuators came on the scene.
New, fancy attenuators like the Universal Audio OX, have both a reactive load, and customizable presets that model well known variations of microphones and cabinets. These attenuators are great because not only do they provide great amp tones at lower volumes, but offer balanced line outputs for live applications, and headphone jacks for bedroom or apartment practice sessions. Of course you’ll pay for all these cool features. The OX is selling for $1300.
Conclusion
I hope this guide gave you some ideas both on how volume controls work in an amplifier, and possible configurations to get the sound that suits you the best.
With any piece of gear, take your time and test out a bunch of different settings. Get to know your gear and the ins and outs of what sounds the best.