
A correctly adjusted neck is essential for a guitar to play and sound its best, but one of the most basic and yet terrifying parts of a guitar setup is adjusting the truss rod in the neck of the guitar.
We’ve all heard stories of a half turn too far resulting in a neck exploding in splinters. Despite these (mostly) exaggerated stories, the neck adjustment on a guitar is simple, easy, and can be performed by any skill level of player. Follow along as we dive into the correct way to adjust the truss rod in the neck of your electric or acoustic guitar.
Table of Contents
What is the Purpose of the Truss Rod?
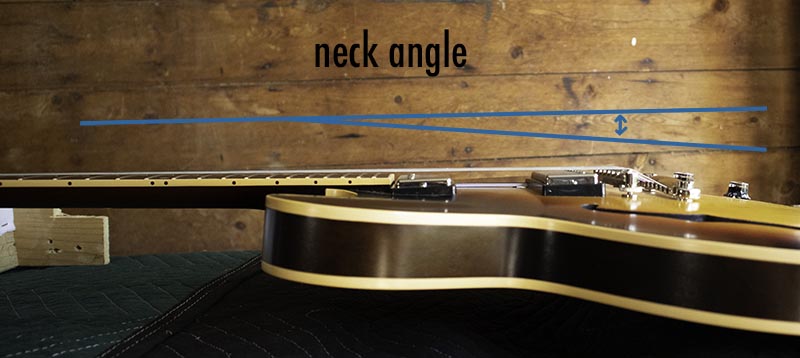
There are two important aspects to the function of a guitar. These are the neck angle which describes the angle at which the neck is attached to the body, and the neck relief which describes the amount of ‘bow’ or ‘relief’ in the neck itself.
The Truss Rod performs two important functions. One is to provide structural support, strengthening the neck and providing additional pressure to counter the pull of all the strings at full tension. The second is to adjust the amount of bow or relief that is in the neck for the best sounding and playing guitar.
Some truss rods are not adjustable and only provide structural support. In these guitars, the correct amount of relief is either carved into the neck itself or achieved through careful sanding and leveling of the frets.
[RELATED: Should I Detune My Guitar After I Play It?]
In most guitars, the neck angle is set at the factory and should be correct from the start. Unless a guitar is older, or vintage, the neck angle should be (and is most likely) within expected specs. If you believe the neck of the guitar may be at the wrong angle, bring your guitar to a qualified tech before adjusting the truss rod.
This leaves us with the neck relief adjustment. This is what we’ll be diving into in this article.
What is Neck Relief?
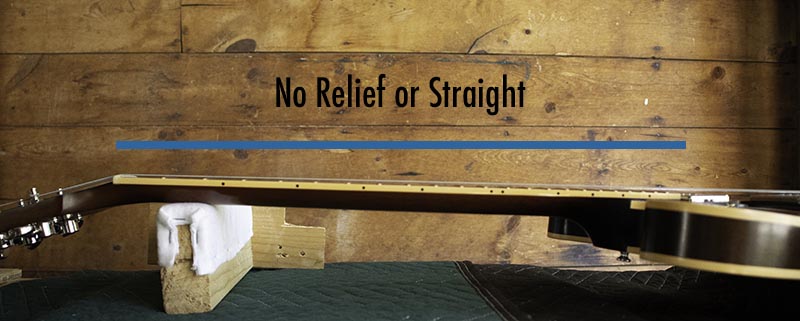
Imagine that the neck of the guitar is perfectly flat like the picture below. This neck has no relief or bow in it. A perfectly straight neck like this is rarely the correct position.
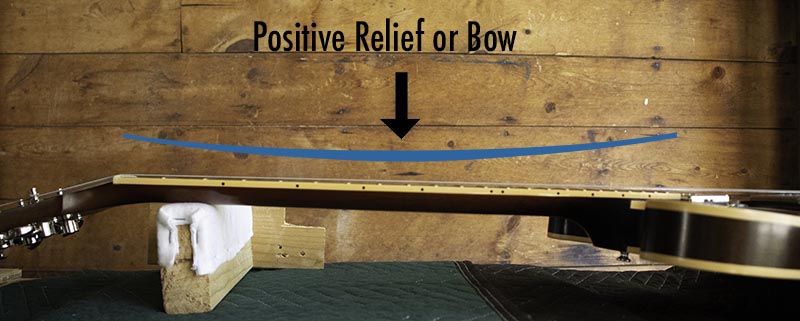
Now take a look at the neck below. This neck has a bow or relief in it, dipping in the middle, offering more distance between the frets and the strings. We’ll address why you’d want this below.
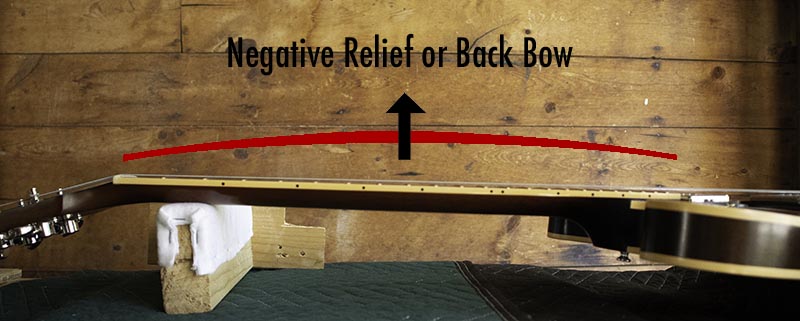
Finally, this is a neck that is back bowed, or has negative relief. This is an incorrect position for a neck, which should never be set past the perfectly level configuration. Tightening a truss rod too much will result in this condition and ultimately result in a failure of the truss rod or the wood of the neck. Read this as a warning: if you tighten the neck too much it will break.
Why Do You Want Relief in the Guitar Neck?
As we can see from the diagrams above, increased neck relief increases the distance between the strings and the top of the frets. Why would you want this? Doesn’t lower string action make for a better playing guitar? Not exactly.
Neck relief plays an important role in increasing the distance between the bottom of the strings and the top of the frets while notes are being fretted. For example, fretting a string on the 12th fret results in the string being incredibly close to the 13th fret. If this distance is too close, unwanted harmonics, metallic fret buzz, or completely choked out or dead notes can result.
Adding a small amount of neck relief increases this distance so that strings, while fretted, don’t touch any other frets between the note being fretted and the bridge. The right amount of relief on a good fretboard will result in clean notes without fret buzz across the entire neck.
As a string vibrates its path make an elliptical motion. This curving of the string from its straight position at rest requires the neck to also exhibit a similar curve in order to stay out of the way of the vibrating string.
The second effect of neck relief is playability. While a flatter neck often results in lower string action, this can result in a tight or stiff feel, especially if you are bending strings. Introducing more string action allows the fingers to “get under” the string, or grab the string in a comfortable manner for a bend. Of course, too much relief and the strings will be too far from the frets resulting in a guitar that is difficult to play fast lines and may have additional tuning and intonation problems.
How to Measure Neck Relief?
To measure the neck relief of your guitar, you’ll need a set of feeler gauges, and three hands. Or a capo if you have less than three hands.
[Related Article: Best Capos for Guitar]
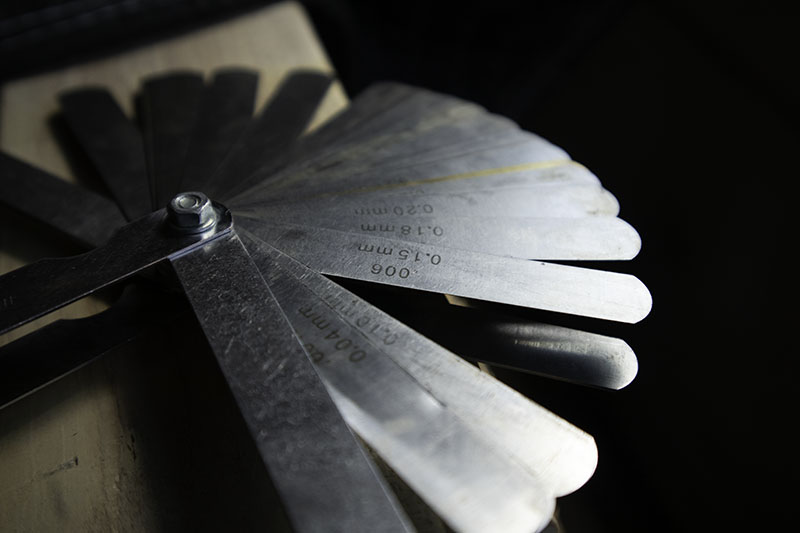
Feeler Gauge Set
My Feeler Gauges of Choice
Great set of gauges for guitar maintenance and repair. You can gap your spark plugs with them too!
The relief of the neck is measured by holding the biggest (6th) string at the first fret and the 19th fret. Then measure the distance between the bottom of the string and the top of the fret at the 7th or 8th fret using a feeler gauge.
The idea is to create a straight edge out of the bottom of the lowest string and measure at the point of greatest neck relief, or at the bottom of the neck’s bow.
Why do we use the 19th fret with the 7th or 8th as the middle point? Let’s take a look at both a Gibson ES-335 with a scale length of 24 3/4″ and a Fender Strat with a scale length of 25 1/2″.
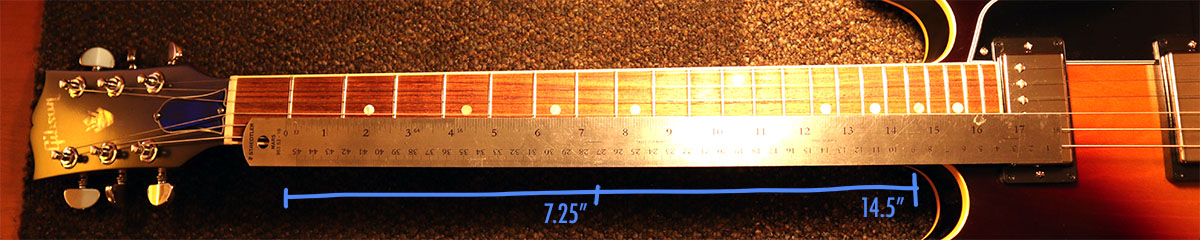
From the 1st fret to the 18th fret measures 14.5″ on the Gibson’s 24 3/4″ scale. Remember we have a capo at the 1st fret and we’re pressing the 19th, therefore we’re measuring from the 1st to the 18th.
Exactly halfway is 7.25″ which is exactly between the 7th and 8th frets. Theoretically, this should be the lowest point of our neck’s arc when relief is added. I decided to test this by putting an excess amount of relief in the neck and measuring the distance between the top of the fret and the string for every fret. These values came out to be:
| Fret Number | Distance From Fret to String |
|---|---|
| 2 | .004″ |
| 3 | .006″ |
| 4 | .007″ |
| 5 | .010″ |
| 6 | .011″ |
| 7 | .012″ |
| 8 | .012″ |
| 9 | .011″ |
| 10 | .010″ |
| 11 | .009″ |
| 12 | .007″ |
| 13 | .006″ |
| 14 | .005″ |
| 15 | .003″ |
| 16 | .003″ |
| 17 | .002″ |
This is a brand new guitar and the data shows a consistency in the neck relief and fret evenness you’d expect from a brand new guitar. Most importantly, the bottom of the arc or the place with the largest relief occurs at the 7th and 8th fret. This matches our measurements which puts the center of the measured distance (1st to 18th fret) exactly between the 7th and 8th fret.
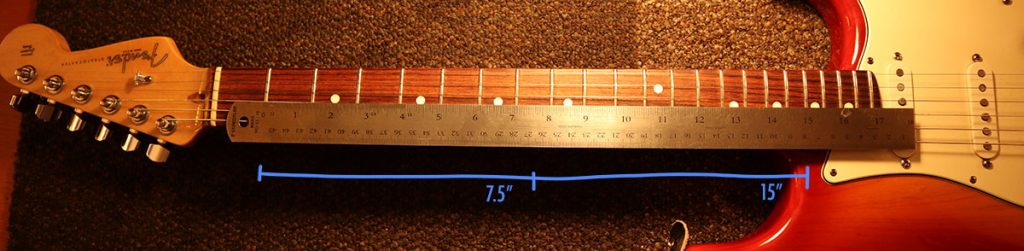
Now let’s check the 25 1/2″ scale of the Fender Strat. Here we measure again from the 1st fret to the 18th which gives us 15″. Half of that is 7.5″ and again we see that this point falls exactly between the 7th and 8th frets.
So should you use the 7th or 8th fret to measure neck relief? For these guitars, it doesn’t actually matter as long as you’re consistent. I use the 7th fret, and I have seen this used by many guitar makers.
If you want to ensure you’re measuring in the correct spot, conduct the experiment I did above to determine the lowest part of the relief arc in the neck of your guitar.
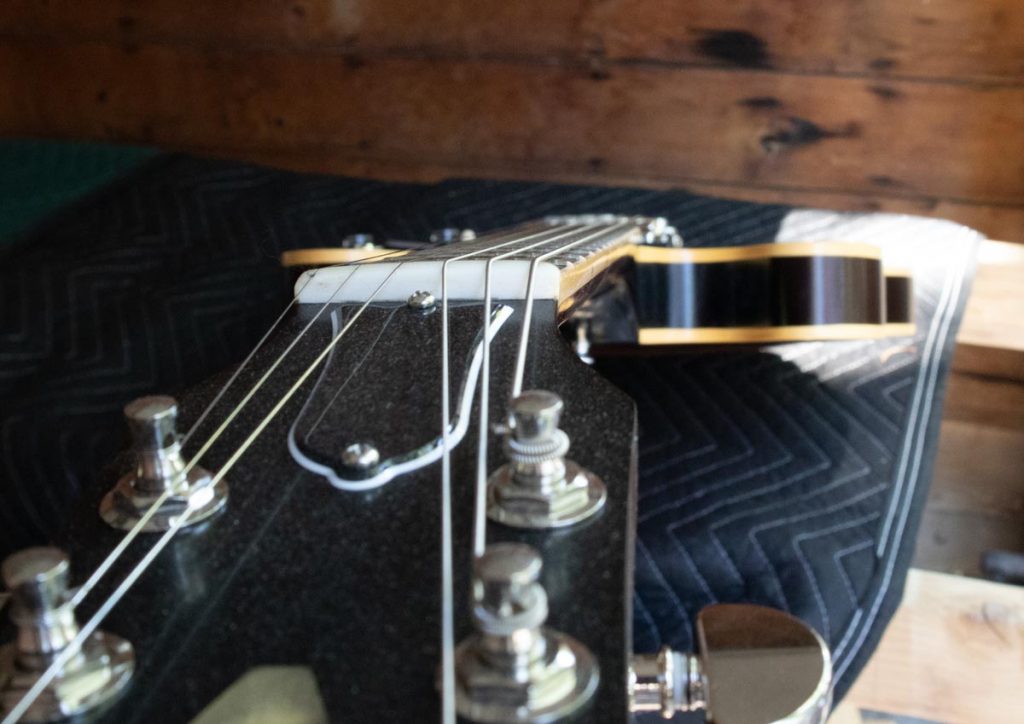
Sighting down the neck
A valuable skill is being able to sight down the edge of the guitar neck to pick up on any bowing action that is occurring. This isn’t as accurate as measuring the action with a feeler gauge, but it does allow for quick diagnosing and can unveil some unexpected or subtle twisting in the neck.
Make sure you’re in a well lit area. Hold the guitar with the body resting on your workbench and the headstock in your hand. Position your head at the end of the headstock so that you can look down the edge of the fretboard.
This allows us to detect at a quick glance if any bow exists and to what extent.
Measuring With a Feeler Gauge
How do you measure with a feeler gauge? It may not be immediately obvious, how feeler gauges work.
A feeler gauge is used to measure the distance between things that are very close together. Instead of using a comically small ruler, we use different thicknesses of steel. A set of feeler gauges has a wide variety of sizes.
As described above, place a capo on the first fret of the guitar and hold the low E string at the 19th fret. Using a feeler gauge, (.010″ is a good starting point) stick the thin piece of metal between the string and the 7th or 8th fret. The gauge should touch both the fret and the bottom of the string, but shouldn’t move the string up at all. Look very carefully at the string while you do this to make sure it isn’t moving when you place the feeler gauge under it.
Which feeler gauge was the perfect fit? Whatever the thickness of that gauge is, that is the relief of your guitar neck.
Guitar Neck Relief Chart by Guitar Model
As described in Correctly Adjust Pickup Height, the values in the chart below are a good starting point for the truss rod adjustment and don’t necessarily represent the most playable setting. Use this as a reference, but remember that all guitars need to be set up for playability (using the steps below).
| Guitar Type | Neck Relief Measurement |
|---|---|
| Fender Electric | .010″ to .012″ |
| Fender Acoustic | .010″ to .012″ |
| Fender Bass | .012″ to .014″ |
| Squier Electric | .010″ to .012″ |
| Charvel | .007″ to .008″ |
| Jackson | .007″ to .008″ |
| Gretsch Electric | .008″ |
| Gretsch Acoustic | .010″ to .012″ |
| Guild Electric | .006″ to .008″ |
| Guild Acoustic | .006″ to .008″ |
| Martin Acoustic | .004″ to .010″ |
| Gibson Electric | .006″ to .012″ |
| Gibson Acoustic | .008″ to .012″ |
Use these figures as a reference and don’t obsess too much about hitting these specs exactly. They represent a starting point only and all guitars need to be adjusted for the best sound and playability and not measurements or specs.
Truss Rod Adjustment Wrench and Tool Chart by Guitar Model
Listed below are the types of guitars and the truss rod wrenches needed to adjust them.
| Guitar Type | Truss Rod Wrench | Amazon Link |
|---|---|---|
| Fender American Stratocaster (and most American made models) | .125″ (1/8th) Allen wrench | Buy Now |
| Martin Acoustic | 5mm (long reach post 2007) | Buy Now |
| Gibson | 5/16″ nut driver | Buy Now |
| Vintage Fender with Slotted Adjustment at Body end of Neck | Slotted Tool | Buy Now |
How to Adjust a Truss Rod?
The thought of adjusting a truss rod for many people is a scary one, but it shouldn’t be! We’re going to be tightening or loosening a metal rod that is in turn moving a wood neck. If you crank down super hard on the truss rod, you will damage your guitar. However, make adjustments slowly and deliberately and you won’t run into any problems. You’ll know well in advance if a truss rod is getting too tight.
Because we’ve all heard the horror stories of guitar necks exploding into a cloud of maple splinters and fretwire, there is a strange rumor that needs to be addressed. You hear some people say, “Never turn a truss rod more than ¼ turn a day.” Well, this is just not true.
If this was the case, no guitar shop/repair facility/or factory could ever get anything done. Large truss rod adjustments are done all the time while setting up a guitar. As long as these are done slowly and carefully, listening for any sound of stress in the neck, there is no danger of taking a neck from back-bowed to bowed in a matter of minutes.
So let’s adjust the guitar neck correctly. This is how:
- Gain access to truss rod which may be under a small cover on the headstock, inside the guitar through the soundhole, or even on the guitar body end of the neck which requires loosening the neck attach screws and pulling the neck off the guitar (more on this special case below).
- Ensure you have the correct wrench or nut driver for your guitar. See Chart Below for Truss Rod Wrenches by guitar type.
- First measure the neck relief to know if you’ll be loosening or tightening the truss rod.
- Now adjust the tension of the rod until the neck is perfectly straight with no relief.
- Slowly add relief back into the neck until all notes are clear without fret buzz or any metallic noises.
- The guitar should play smoothly across all positions of the neck and should have a similar feel in all positions.
For specifics on how the neck adjustment fits into the overall guitar setup, check out Setup Like a Pro: How to Correctly Setup a Stratocaster.
Don’t forget to add back pressure! This is true for anything that gets tightened on a guitar, but especially for the truss rod. If you are loosening the truss rod, always add a small amount of pressure back into it. This ensures that the truss rod won’t continue to loosen because of a lack of pressure on the truss rod threads. This same concept can be applied to tuning keys, bridge set screws, and anything else that has tension on it.

Does a Guitar Neck Settle?
A guitar neck will move, changing relief, based on changes in temperature, humidity, tuning, or string gauge. Oftentimes, a guitar neck will change slightly over the couple of days after a neck adjustment has been made. This is normal and should not cause alarm.
After a truss rod adjustment, revisit the guitar everyday and make sure that it still plays well and more adjustments are not needed. If you have taken your guitar to be set up by a tech at a guitar shop, don’t hesitate to bring the guitar back if the neck has shifted over a couple days.
This is a great argument for learning how to do all of this setup work yourself. Movement in guitars is inevitable, and the ability to make small adjustments as this happens is crucial to having guitars that play great.
Double Action vs Single Action?
A single action truss rod only tightens in one direction. This is from the loose position which allows for relief in the neck to a tightened position which would straighten the neck and eventually produce back-bow.
A double action truss rod tightens in both directions, allowing for the introduction of relief and negative relief (or bow and back-bow). A double action truss rod can be helpful in the rare event that a neck settles into a flat profile even under full string tension.
How do I know if my truss rod is single or double action? Commonly, single action truss rods are in older guitars, while many newer instruments have double action rods. However this isn’t always the case.
To check which type your guitar has, simply loosen the truss rod until there is the least amount of tension on it. Give the rod a couple more turns and if it is a double action rod you’ll feel it start to get tight again. If you don’t feel it get tight then STOP! You don’t want to unthread the adjustment nut from the truss rod which can happen if you keep loosening it.
Adjusting the Neck on a Gibson Guitar
All Gibson guitars have a truss rod adjustment under the truss rod cover on the headstock. With a small screwdriver, carefully remove this and store in a small container. Using a ¼” nut driver, or the wrench that came with the guitar, tighten or loosen the truss rod based on the needs of the setup.
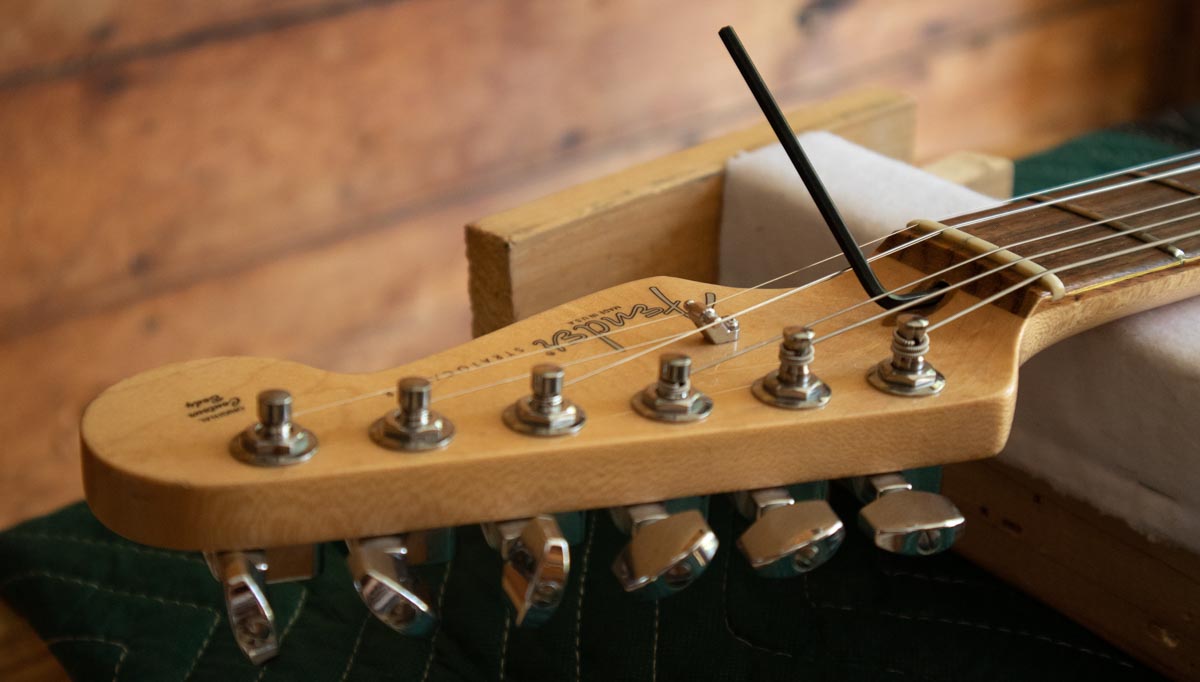
Adjusting the Neck on a Fender Stratocaster
Modern Fender guitars have the truss rod adjustment at the headstock that can be accessed through a small hole. Use the appropriate Allen wrench size from the chart above to make the adjustment to either tighten or loosen the truss rod.
My American Standard Strat takes a .125″ or 1/8″ inch Allen wrench.
Adjusting the Neck on a Martin Acoustic
Martin acoustic guitars are notoriously tricky to adjust the truss rod simply because the adjustment nut is farther in the soundhole than most acoustics. With the correct Allen wrench, this is a simple task.
Most Allen wrenches are too short to reach and don’t provide the leverage needed if you can get it to seat correctly. Save the headache and get the correct wrench for your guitar.

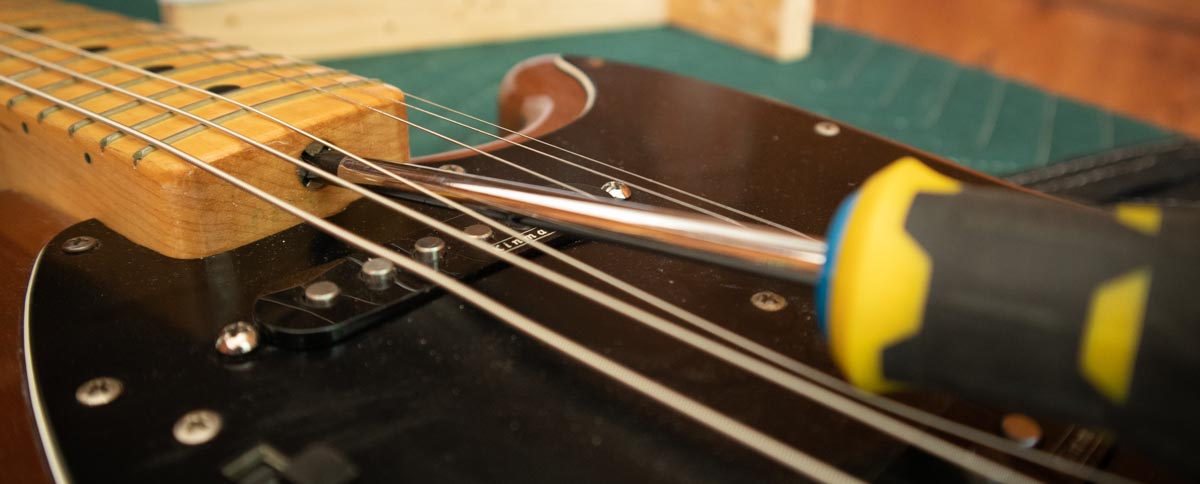
Adjusting the Neck on a Bolt on Neck with no Adjustment in the Headstock
Many vintage instruments, like my 1979 Fender Mustang, have the truss rod adjustment on the body end of the guitar neck. These are only accessible by removing, or greatly loosening the bolts that hold the neck to the guitar.
If you have any concerns about doing this repair work, or have a valuable vintage instrument, don’t hesitate to take it into a professional. Because the large screws holding the neck to the guitar body are holding onto wood instead of metal, damage can occur from overuse. If those screws are loosened and tightened too many times, their holes will likely need to be filled and re-drilled in order to maintain a strong neck and body connection.
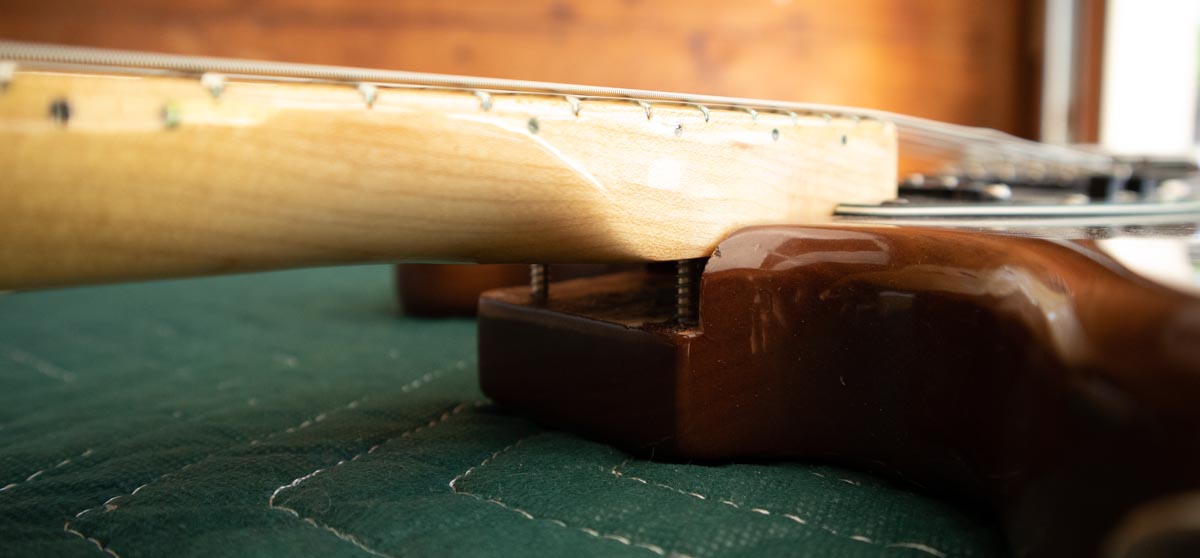
Here is what this looks like on my Fender Mustang. Make sure to fully loosen the strings before loosening the neck screws. Many times there are shims under the neck for a neck to body adjustment. Lift the neck straight up out of the neck pocket so that any shims under the neck don’t fall out.
If possible, only perform one adjustment to minimize the number of times the neck screws are moved.
Help! My Truss Rod won’t budge
A normal truss rod doesn’t require much force to adjust it. Don’t crank down on the truss rod if it isn’t moving, this could cause permanent damage.
First make sure that the strings are completely loose. Now shift the wrench back and forth in very small movements. If the truss rod won’t move at all, stop there and take the guitar to a professional. They may be able to work the truss rod free and will know how much force is possible before damage will occur.
If the truss rod begins to move, continue making small back and forth movements, slowly getting larger and larger until the desired adjustment can be made.
Again, if you are at all concerned about this just take it to a professional who can diagnose the issue without danger of ruining the neck of your guitar.
Can I adjust the truss rod with strings on the guitar?
For most guitars and with operating truss rods, there is nothing wrong with making adjustments with the strings on the guitar and at normal tension.
If the truss rod feels tight, or you want to be extra gentle with a high end or vintage instrument, then take some tension off the strings, but completely loose isn’t necessary.
The only time you must completely loosen the strings is if you have a guitar neck that adjusts from the body end. If there is tension on the strings while the neck screws are loosened, damage can occur to those screws, or the holes in the neck where the screws are seated.
What if my guitar doesn’t have a truss rod adjustment?
Some guitars don’t have a truss rod adjustment. Most notably, Martin acoustics prior to 1985 didn’t have adjustable truss rods.
This doesn’t mean that they don’t have truss rods, it just means that the truss rods they do have are not adjustable. Martin used a steel channel that supported the neck and kept it relatively straight. And while this worked for many decades, it’s not uncommon for vintage acoustics like these to require a neck reset to fix a neck angle that has grown over the years. The increased neck angle is a function of the guitar top moving as well as the neck block and dovetail neck joint, not the truss rod failing.
Some modern, high end guitar makers still use this method, often employing materials like carbon fiber to ensure the most stable neck possible which creates an instrument that is much less susceptible to temperature and humidity changes.
Check out this McPherson that utilizes a carbon fiber, non-adjustable truss rod. These guitars are built like tanks and ring like a grand piano.
Can adjusting the truss rod break the guitar neck?
While adjusting the truss rod in the neck of your guitar is incredibly simple, and should be learned by all skill level of players, if pushed beyond its limit the truss rod will either break itself, or the wood surrounding it.
How do you know how much is too much pressure on the truss rod? Never crank hard on the wrench in your guitar. A properly functioning truss rod will move with medium amount of pressure resisting the adjustment that lets you know you are indeed moving the wood neck slightly.
No truss rod will move easily and then suddenly break. Listen to your guitar and ease up if you feel like you’re putting too much force on the truss rod. Don’t hesitate to take your guitar into a professional and ask for help. They can teach you how to tell how much pressure is OK.
How to Tell if Your Guitar Neck Needs Adjustment
Read the full article: How to Tell if Your Guitar Neck Needs Adjustment
You may need to adjust your guitar neck if:
- You experience fret buzz or notes choking out
- The string action has increased or decreased
- The guitar has changed climates either hot or cold, or humid to dry
- Putting a capo on the guitar causes buzzing
- The guitar feels tight, and bending strings is difficult.
For more info, read the full article that covers this topic and the actions necessary for the conditions listed above.