
Correct height on an electric guitar pickup is essential for a guitar to play and sound its best. Pickups that are too high can cause string magnetic interference typically resulting in a warbly sound, and pickups adjusted too low mute an already small voltage output and leave a guitar sounding wimpy and dare I say, castrated.
It might be tempting to dive straight in, but adjusting the height of your pickups should be the last step on your guitar setup list. Make sure your guitar is properly setup first before diving into these adjustments.
Setting the correct pickup height is an easy adjustment to make on your guitar, and one that you should learn how to perform. Being able to make these tweaks to your own gear will get you knowing your guitar better, and also save you some bucks that otherwise would have been spent with the guitar tech.
SETUP TIP: When working on guitar electronics you need a quick and easy way to determine if you’re getting output from your pickups. First of all, having a small amp next to your workbench makes plugging in super easy and accessible (no lugging your 8×10 Bassman over to your workbench).
With the guitar plugged in, take a small screwdriver and tap on the pickup pole pieces. You’ll hear a very noticeable and obvious thump if the pickup is sending signal out of the guitar. Now tap a pickup that isn’t turned on. You’ll notice an obvious lack of thump when you’re not getting any signal.
Be extra careful when working with single coil pickups. These pickups use magnets as the pole pieces which can be brittle and chip if tapped too hard. Humbuckers use steel screws and pole pieces that sit on top of a bar magnet making them considerably more durable when exposed to metal on metal contact.
Now this is a great down and dirty way to diagnose wiring issues, or to confirm which pickup you’re listening to before making adjustments to pickup height.
Table of Contents
How to Adjust Electric Guitar Pickup Height
While there are factory specs you can look up and set your guitar to match, each pickup, guitar, and players styles are a little bit different and therefore need to be customized to your style of playing. We’re going to go through the process of setting the pickup height to match your style.
Again, before we start make sure that your guitar is properly setup, and most importantly, make sure you have a fresh set of strings on your guitar. Old strings can imitate the sound of a pickup that is adjusted both too close and too far away from the string making it impossible to dial in the correct setting.
Take a reference measurement
Before starting, let’s take a reference measurement to make sure that we can always press the reset button and go back to the original settings if need be.
All measurements are taken with looking across the body of the guitar and measuring between the top of the pole piece, or top of the pickup cover whichever one is higher, to the bottom of the string while pressing on the last fret. Because different setups will affect the overall height of the strings relative to the pickups, the string is fretted at the last fret to pull that variable out of the equation.
Measurement can be taken in either millimeters or 64ths of an inch. I use inches because I’m stuck in my ways and have used inches forever. One day I’ll change, I promise!
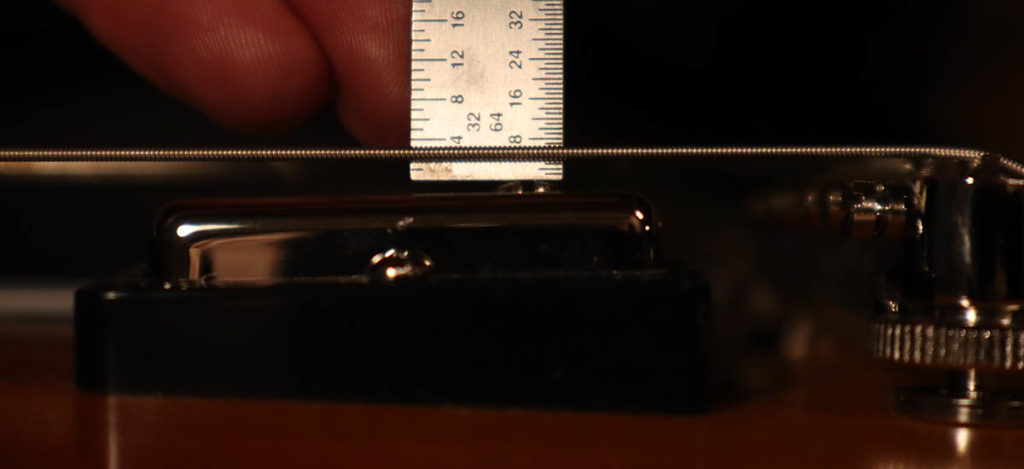
This is the small, inexpensive ruler I use for all of my repair work: https://amzn.to/2toHwC5
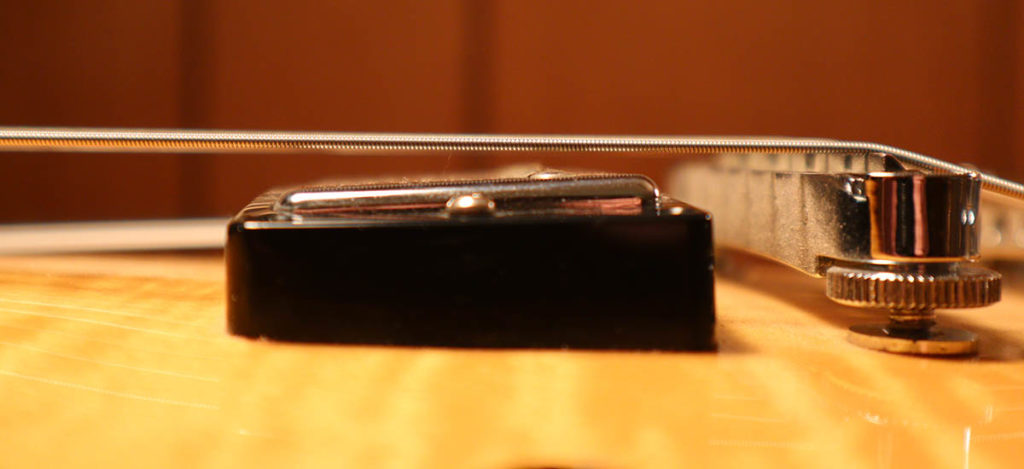
Pickups are typically adjusted with small screws on the bass and treble side of the pickup. You can see the adjustment screws in these photos. They have a round head and will either be slotted or a phillips style.
Because pickup adjustments are made at the bass and treble sides of the pickup, we measure on both the high and low E strings.
On some pickups, like most humbuckers, individual pole pieces are adjustable through a standard, or slotted head screwdriver. Do not adjust these unless you absolutely have to. You can fine tune pickup response string by string, but this should be a very last, small adjustment. All major changes should be made by adjusting the body of the pickup up or down first.
Jump to the Pickup Mount section to determine which direction you’ll be adjusting your pickup height screws.
Angle of the Pickup to the Strings
The top of the pickup body should always be parallel (or close to it) to what the pickup is attached to whether it’s a pickguard (like a Strat) or a pickup ring (like a Les Paul, ES-355). This provides the pickup with the best setting to capture the vibration of the strings through the magnetic field generated by the pickup’s magnets.
It take sufficient pressure from the mounting springs or spacers to keep the pickup oriented correctly. If the pickup is loose and not staying in place, then you may have an issue with old, or incorrect springs or mounting hardware.
Making the first adjustments
Now that we have our starting point measured and recorded, let’s start adjusting the pickups.
When adjusting pickups the guitar needs to be plugged into an amplifier so you can hear the results of the adjustments in real time. I know it sounds obvious, but make sure that only the pickup you’re working on is selected. If multiple pickups are activated you won’t have any way to tell the effects of your adjustments.
SETUP TIP – Start with the bridge pickup and move to the neck. The reason I do it this way is because most players generally like the bridge pickup to sound just a tad bit hotter than the neck pickup for playing lead lines and solos. My method for adjusting pickup heights finds the closest distance to the strings while still sounding good.
Starting with the bridge gives you that starting point. Now when we work towards the neck, we can be balancing the pickups and then dropping them just slightly so that the neck output is just slightly lower than our bridge. If we did it the other way we’d have to come back to the neck pickup to make adjustments after doing the bridge anyway, so might as well start at the bridge.
With the guitar plugged in, and the pickup selected, fret the low E string at the last fret. Adjust the pickup height up so that the pickup is slightly under the string, but not touching it. Do the same on the treble side under the high e string.
This should be too high, but we’re going to adjust the pickup down from this point. Using a pick, or fingers depending on what will be used most with the guitar, play all the open strings and see what that sounds like. Most likely, you’ll hear a dampened and muted tone with some warble in the notes. This is because the magnetic field of the pickup is influencing the natural movement of the string. Let’s get rid of that warble by adjusting the pickup a bit lower.
When pickups are adjusted too close to the strings you can also hear a quacky tone that overwhelms any nuance that come out in the dynamics of your guitar playing. Putting the pickup in the sweet spot will get rid of that quack and allow the pickup’s character to really come through.
Continue to adjust the pickup lower, making small adjustments to the bass side, then the treble side. Pluck the strings and listen closely. As you get closer to where the pickup is sounding good, go ahead and start playing up and down the neck. Play full chords up the neck, then some solo lead lines up above the 12th fret.
Once you get the overall volume where it sounds good, focus on the balance between the bass and treble sides. Bass notes should be clear, and not woofy. Treble notes should be clear and not biting. Measure the pickup height again and record these values.
Once that pickup is in a good place, let’s move forward to the neck. Generally speaking the neck pickup will be in a similar position to your bridge, but adjusted just slightly lower to get more of a rhythm tone. To save some time, just adjust the neck pickup to the bridge specs that you just recorded. Now play through both bridge and neck pickup to get them to match in volume, then lower the neck pickup slightly to give it a warmer, slightly quieter tone.
Typically bridge pickups are designed to be higher output than neck pickups. This means that you may find the pickup heights to be very similar but the bridge pickup will be outputting more volume. The reason for that is because of a hotter pickup in that position.
For instance, the pickups in my Gibson ES-137 are the 490r in the neck and the 498t in the bridge. This is a common pickup configuration for Les Pauls as well. The 490r measures just above 8k ohms while the 498t measures between 13k and 14k ohms. This is a pretty large difference, and it’s quite obvious that the bridge pickup is outputting more juice. For this reason, the difference in pickup height is very similar between the bridge and neck with the neck pickup just slightly lower compared on the bass side. This particular neck pickup is pretty hot on the treble, so that is adjusted even lower to pull some harshness from the high end.
Now at this point I’ll pull the guitar off the workbench and sit down with it plugged into a nice amp. It’s time to make small adjustments and fine tune the setup. If you have access to it, plug it into the rig that you’ll be using the most. Small differences in pickup output can have major impacts on dynamics and sounds of effects pedals. With that in mind, use different pedals and pedal combinations to make sure the pickup output gives you the desired result.
I described this process for a guitar with 2 pickups, but the same rules apply for a guitar with 3 or more pickups. Start at the bridge and work your way to the neck using the bridge pickup as your reference. While doing this, you’ll be constantly switching between all of your pickups to make sure they are balanced within the context of the overall output from all pickups.
Adjusting individual pole pieces
While it can be tempting to start adjusting the individual pole piece screws in a humbucking pickup, make sure that this is your very last step and that you’ve adjusted the entire pickup before going down this road.
I’ve seen some very interesting (read concerning, funky) pickups where people started messing with pole adjustments and got overwhelmed.
If you’ve adjusted your pickups and they’re sounding great and balanced, but one string is sounding a bit hot or a little quiet, that’s when you can make small adjustments to these screws for better balance. Most commonly, the G string will be overpowering the strings around it and that screw will need to be set in slightly for better balance.
As always, take reference measurements so you know where you started, then make small adjustments until things are sounding right.
Electric Guitar Pickup Heights
While pickup heights are determined by each guitar’s unique setup, and the qualities of each pickup, default heights are a great starting point from which to fine tune the pickup’s configuration. Below are real pickup heights on four of my own guitars which have been setup and adjusted correctly. I’m also including factory spec pickup heights for a number of guitars as released officially by Fender.
The Guitar Pages pickup height examples:
| Guitar and Pickup | Bass Side | Treble Side |
|---|---|---|
| Fender American Stratocaster | Neck: 8/64″ Middle 7/64″ Bridge: 7/64″ | Neck: 8/64″ Middle: 5/64″ Bridge: 5/64″ |
| Telecaster | Neck: 4/64″ Bridge: 5/64″ | Neck: 3/64″ Bridge: 5/64″ |
| Gibson ES-137 | Neck: 5/64″ Bridge: 4/64″ | Neck: 10/64″ Bridge: 6/64″ |
| Gibson ES-335 | Neck: 3/64″ Bridge: 2/64″ | Neck: 3/64″ Bridge: 3/64″ |
Fender factory specs pickup height (strings fretted at the last fret)
| Instrument/Pickup Type | Bass Side | Treble Side |
|---|---|---|
| Fender Guitars | ||
| Texas Specials | 8/64″ | 6/64″ |
| Vintage Style (Guitar) | 6/64″ | 5/64″ |
| Vintage/Hot Noiseless | 8/64″ | 6/64″ |
| Standard Series Single Coil | 5/64″ | 4/34″ |
| Lace Sensors | As close as desired (allowing for string vibration) | |
| Fender Humbuckers | 4/64″ | 4/64″ |
| Fender Bass | ||
| Noiseless (Bass) | 8/64″ | 6/64″ |
| Amer. & Mex. Standard (Bass) | 6/64″ | 5/64″ |
| Vintage Style (Bass) | 8/64″ | 6/64″ |
| Lace Sensor (Bass) | As close as desired (allowing for string vibration) | |
| Squier Guitars | 8/64″ | 6/64″ |
| Squier Bass | 7/64″ | 7/64″ |
| Charvel/Jackson | 6/64″ | 5/64″ |
| Charvel/Jackson (Bass) | 7/64″ | 7/64″ |
| Gretsch (Filter-tron, bridge) | 3/16″ | 3/16″ |
| Gretsch (Filter-tron, neck) | 5/32″ | 5/32″ |
| Gretsch (Dyna-sonic, bridge) | 7/32″ | 7/32″ |
| Gretsch (Dyna-sonic, neck) | 3/16″ | 3/16″ |
| Gretsch (Bass) | 3/16″ | 3/16″ |
| Guild (Electric) | 3/16″ | 3/16″ |
| Guild (Electric Bass) | 3/16″ | 3/16″ |
Types of electric guitar pickup mounts
There are a couple different methods for mounting pickups to the body of an electric guitar. The method used will determine which direction you’ll be turning the set screws in order to adjust the height of the pickup.
Fender Style
On most Fender style guitars, pickups are mounted to the pickguard with springs or rubber inserts providing resistance between the pickup and the pickguard. This means that you’ll be adjusting the pickups tighter (clockwise, righty tighty) to bring the pickup closer to the strings.
For pickups mounted like this, the concern is loosening the pickups to the point where they fall off the set screw and into the body of the guitar.
Gibson Style
Most Gibson style pickups and guitars with humbuckers mount the pickup to what’s called a pickup ring which in turn is mounted to the top of the guitar. These pickups are similar to Fender style pickups in that turning their set screws clockwise will bring the pickup closer to the strings
Ibanez Style
Ibanez and some other manufacturers use a mounting system that does not utilize a pick guard or pickup mounting rings at all. These pickups are mounted directly to the bottom of the guitar through screws and springs.
The main difference with this style of pickup is the direction to raise the pickup is counter-clockwise (cyclonic, lefty loosey). With the other design, the pickup is getting tighter to the mounting point and more stable while this setup has the pickup getting looser as it gets closer to the strings.
Take care with either design that the pickups aren’t too loose. Too loose pickups can shift and stop producing a proper sound. If they’re that loose they’re also probably quite close to falling off the screws and falling into the body of the guitar. This isn’t a difficult repair, but can be frustrating when you’re so close to being finished with a setup.
Adjusting the Pickup Screws Doesn’t Do Anything
If adjusting the pickup height screws doesn’t affect the height of the pickup, the pickup has either fallen off the end of the screw, the screw isn’t the right fit for the pickup, or the spring or rubber insert isn’t providing enough tension between the mounting point and the pickup.
It will be pretty obvious if the pickup has fallen off the screw as it will probably drop into the guitar, or be flopping aimlessly about.
Springs and screw types used vary considerably from manufacturer to manufacturer and even from model to model. If you’re replacing these parts, it’s typically best to take your guitar to the shop where you are buying them so you can test them right there. This will save you from the frustration of screws that don’t fit quite right, or springs that are too strong or not strong enough.
If the pickup is adjusted to where you think it’s supposed to be, and it’s starting to feel very loose, try longer screws and larger springs. This should help stabilize the pickup body.
The Pickup Fell into the Body of the Guitar
If the pickup in your electric guitar falls into the body, don’t worry this is a pretty common thing and isn’t a big deal to fix. The easiest way to stop this from happening is to keep a close eye on pickup height. Ideally you’ll also be noticing the pickups get farther from their correct position because they’ll be getting considerably quieter or louder depending on the type of mounting system your guitar uses.
For all guitars, you’ll first have to either loosen all the strings or remove them. For guitars with humbuckers mounted in pickup rings, you can easily work on the pickups without removing the strings. For a guitar, like a Strat, where the pickups are mounted to the pickguard, this whole thing needs to be removed which makes it quite a bit harder (not impossible!) to do with the strings on.
Thankfully, springs and screws are attracted to magnets so most likely the hardware hasn’t gone anywhere. Also good to note if you pull the pickup out and can’t for the life of you figure out where that dang spring went. Take a good look at the body of the pickup, it’s probably clinging to life there.
Adjusting Active Electric Guitar Pickups
Adjusting active pickups works in the same way as passive pickups, however because the output is dependent on the height and the voltage of your battery, make absolutely sure before you start adjusting pickup height that you’re running a fresh battery in your guitar.
Pull the battery out, stick a multimeter on it and test your DC voltage. It should be reading 9.x volts. Anything lower than x volts should be replaced with a fresh battery before making any adjustments.
Read: How do I know if my guitar has active pickups?
Dealing with Non-Standard Pickup Mounting
Most guitar pickups are quite easy to adjust, but not all are meant to be moved up and down so easily. Typically, manufacturers will have defined limits for pickup output and quality control will catch anything coming off the production line that doesn’t fit those criteria. That’s to say, if you’re working on a relatively new guitar first ask yourself if there may be some other reason the pickups are sounding off before making adjustments.
There are some guitars that mount pickups in ways that make adjusting the height very difficult if not impossible. Therefore, exhaust all other options before making changes to the height of the pickups.
Example: the Epiphone Emperor
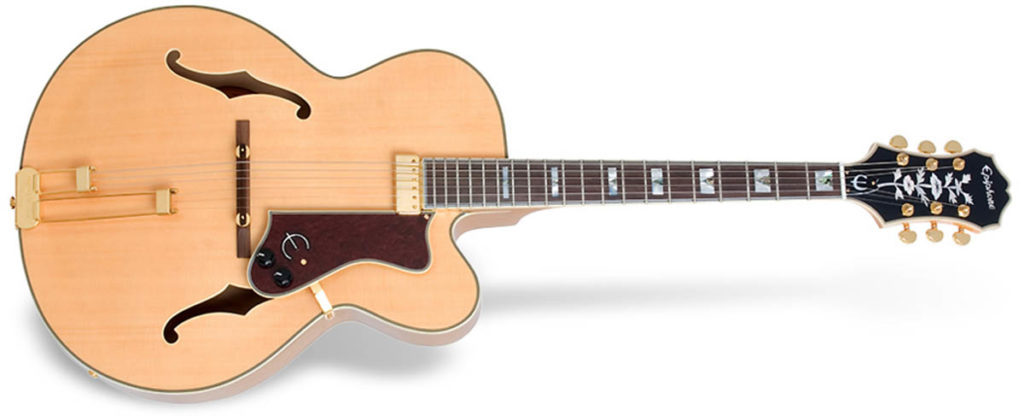
The Emperor is a line of full hollow body guitars that Epiphone has been building since the 1930s. These guitars come in a variety of pickup configurations, but one of the more interesting ones is found on the Regent model.
This model showcases a floating pickup that is mounted to the pickguard and the side of the fretboard. Adjustments to pickups like this must be made through the mounting brackets, and may require making some slight bends to the metal.
If you’re working on a vintage guitar, never bend these mounting brackets. Irreversible damage can often occur by bending old metal parts.
Example: Epiphone Casino
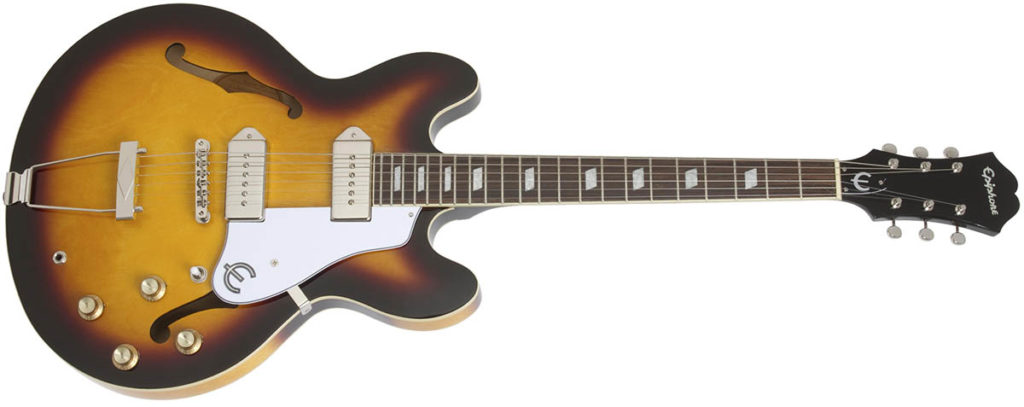
Another Epiphone guitar, the classic Casino uses a P-90 pickup that is mounted to the top of the guitar without pickup rings for adjustment. That means that very little can be done to change the pickup height once they’re on the guitar. Pickups can be shimmed to bring them closer to the strings, but typically there isn’t a ton of room to play with on these guitars and it’s better to let the character of the aging pickups and guitar come through.
Conclusion
Setting pickup height is one of the many necessary skills you need to know for a correctly setup guitar that sounds and plays its best. Thankfully, this process isn’t very difficult or high consequence. Just make sure to take reference measurements and some photos before you start so you can always go back and press reset on your work.
While there is a recommended configuration, pickup height is based on personal preference for the type of sound you like and the type of music you’re playing. Don’t let others tell you how to setup your guitar. Get to tinkering and find your unique sound.