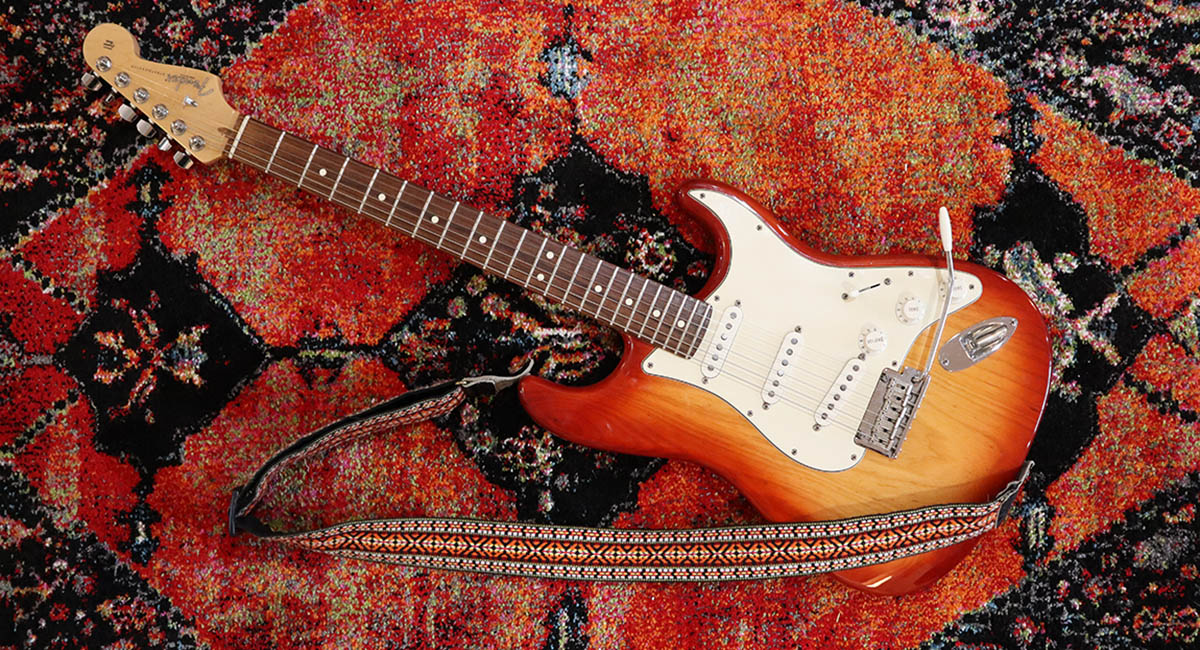
Doing setup work on your own guitar can be intimidating at first, but once you get the hang of it it’s easy to do, saves you money, and allows you to dial in your guitar to play exactly how you like it. Follow along for a step by step guide to setting up your Stratocaster to play perfectly.
Setups are unique to each guitar and each player. The configuration of your guitar depends on the gauge of string, playing style, genre, technical needs, and many other factors. While it’s important to have reference measurements as places to start, not all guitars will play well at those settings. For instance, Fender recommends .010” neck relief for a Strat, and while this is a great starting point, you might find that you like it better at .15” or totally straight. It all depends on how you like the guitar to feel.
In this step-by-step guide to setting up your Stratocaster, I’m going to walk you through how I set up a Strat from start to finish. I’ve set up hundreds upon hundreds of Strats, but every guitar is unique and I enjoy dialing each one in to play the best that it possibly can.
A guitar setup is subjective: Don’t let anyone tell you exactly how a guitar should be set up. Sure, there’s a general range that most people like the configuration of their guitar, but at the end of the day it’s up to you, the player, to determine what feels and sounds the best. In this guide, I will describe the specs of my ideal Strat setup which may or may not align with your guitar or your style of playing.
This is a guide: This is how I personally set up guitars, which I’ve learned from years of experience. People do things in different ways, and there is more than one way to set up a guitar. Use this as a guideline to get you started, you’ll find certain methods work for you better than others. Enjoy, and have fun.
Table of Contents
Tools Needed to Set Up Your Stratocaster
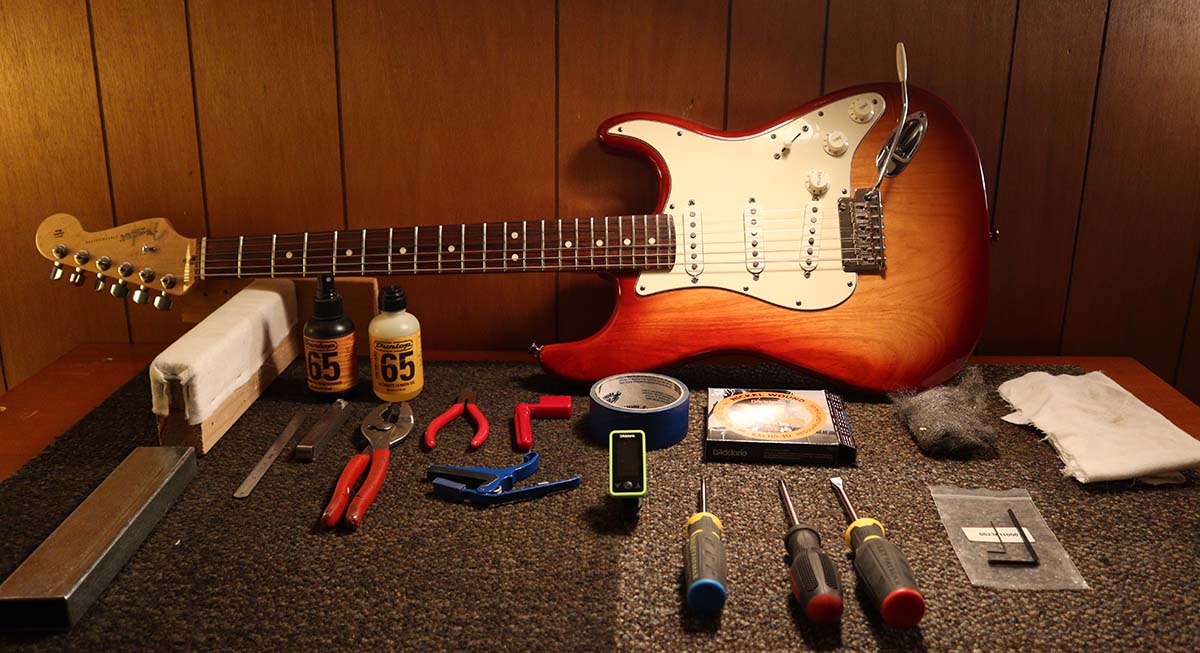
- Workbench or Table
- Neck Support: You don’t need anything fancy here. As you can see, I use a block of 2×4 covered in flannel. The 2×4 has a 1×4 screwed to the end for stability. A rolled up beach towel works great.
- New Strings: I’m using a fresh set of D’Addario EXL110 10-46
- Tuner: The Best Clip On Tuners for Guitar
- Capo: The Best Capos for Guitar
- Feeler Gauges: Nothing fancy, here’s the set I use. Works great on motorcycles too!
- Small Ruler with 64ths: These are good and cheap, just make sure it has 64ths on it.
- Pliers
- Blue Painters Tape
- Steel Wool
- Screw Drivers (2 phillips, 1 standard)
- Adjustment Allen Wrenches: my Strat uses a .050″ for the saddle screws and a .125″ for the truss rod. These came with my guitar.
- Guitar Cleaner and Fretboard Conditioner
- Polishing Cloths
- String Winder
Essential Skill: Adding Back-Pressure
Whenever you are working with any type of screw, threaded rod, or machine tuner, it’s important to always apply back pressure. What is back pressure?
When you loosen a screw, if you simply stop turning it, the force that’s being put on that screw will keep turning it past where you left it.
For example, if you loosen your truss rod but don’t add any back-pressure, over the next week or so the truss rod in the neck will continue to loosen slightly adding more relief to the neck than you originally wanted.
This is true when tuning your guitar too. Always tune up to a note. If a note is sharp, tune down below the intended note and tune back up to the note you want. This provides back-pressure on the tuner that will keep the string in place and in tune.
Prep Your Work Area
If you don’t have a workbench you can use a clear table. Just make sure that you have plenty of space to work and you’re in a comfortable position. I use a workbench that I can stand comfortably at and not bend over.
Make sure your area is clean and well lit. My workbench top is covered in carpet remnants that I replace as needed. I vacuum the top thoroughly before setting a guitar on it to ensure no debris scratches the guitar’s finish.
I like these style of mats because they have a soft material for the guitar to sit on, but more importantly make it really easy to spot metal shavings or other debris that could scratch your guitar.
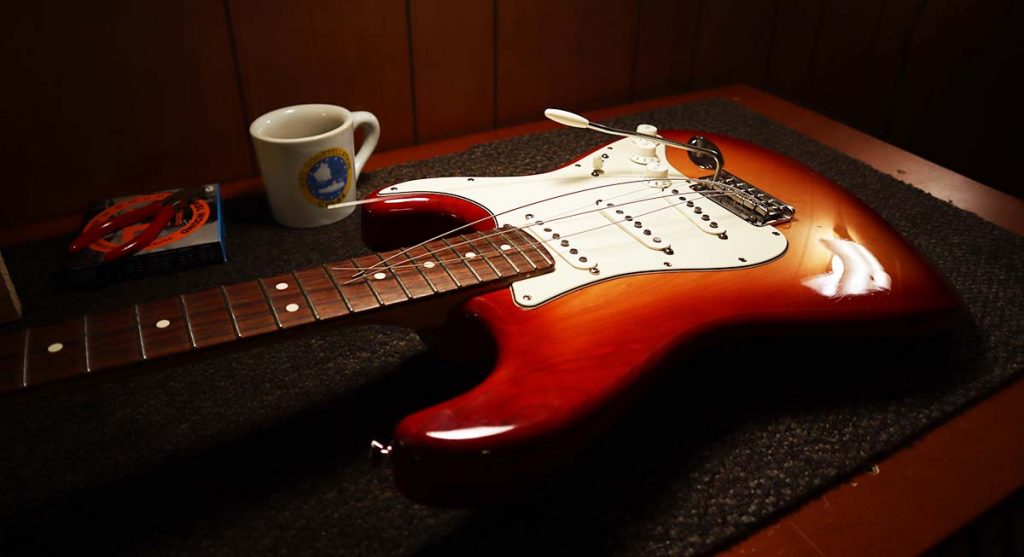
Remove The Strings
I never set up a guitar without first replacing the strings. As strings wear out the way they vibrate and the way they intonate changes. In fact, older strings will start to distort and become inconsistent in their diameter. This creates wonky tension which fundamentally changes the configuration of the instrument.
This is a hard rule. Always change the strings when setting up a guitar.
Recommended Article: A Visual Step-By-Step Guide to Changing Your Acoustic Guitar Strings
Clean The Guitar
Read: Setup Like A Pro: How to Clean Guitar Electronics
The other advantage of changing the strings is that now with the strings off the guitar, you can clean and dust all of those hard to reach areas and tighten any loose hardware.
If you have any electronics that are causing issues, like scratchy pots or popping switches now is the time to dig into that. Learn more about cleaning guitar electronics in this article.
Do you have static on your Strat? Usually this shows up in the form of static electric popping as you run a finger over the pickguard. If this sounds familiar, check out How to Get Rid of Static on your Strat.
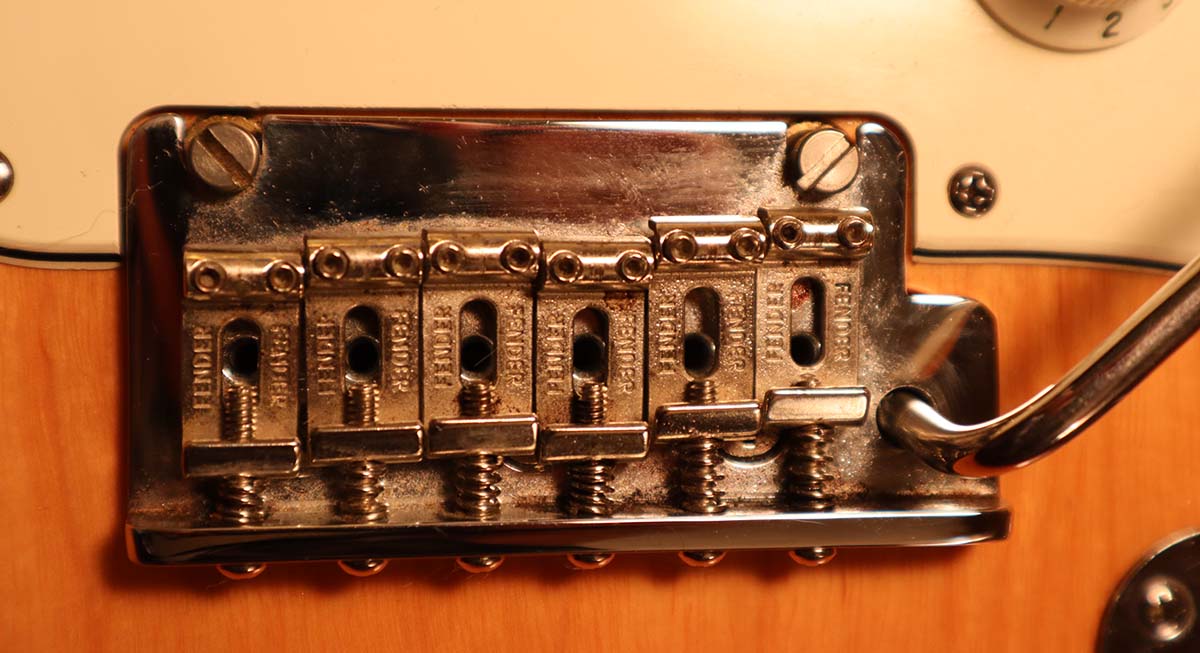
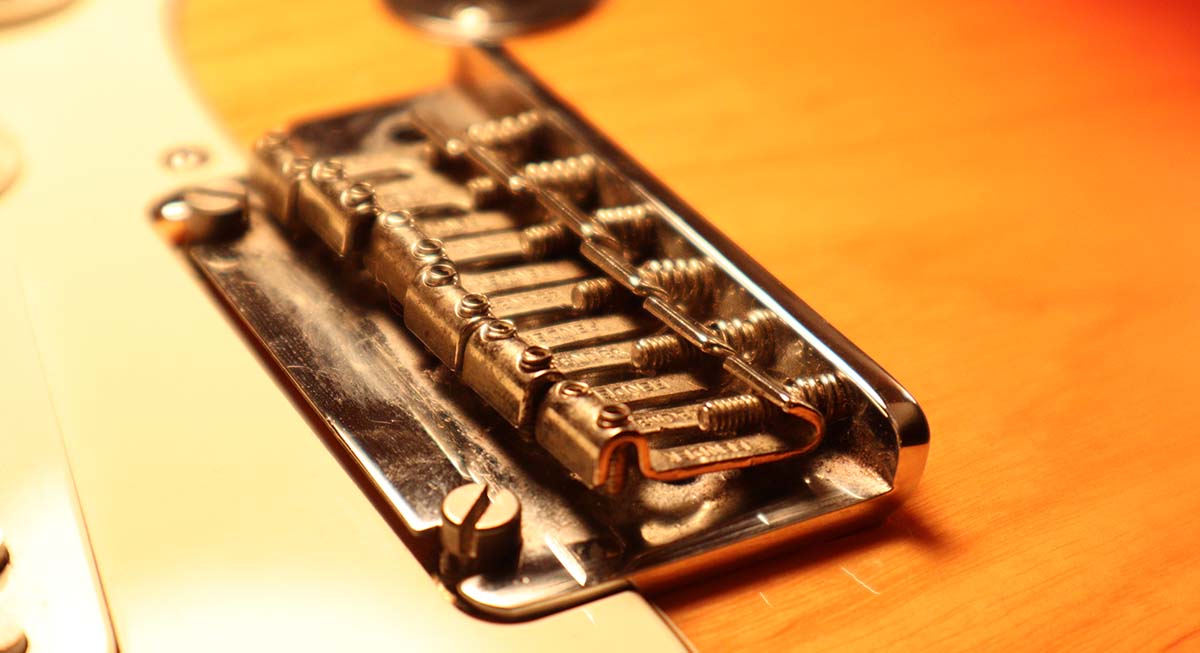
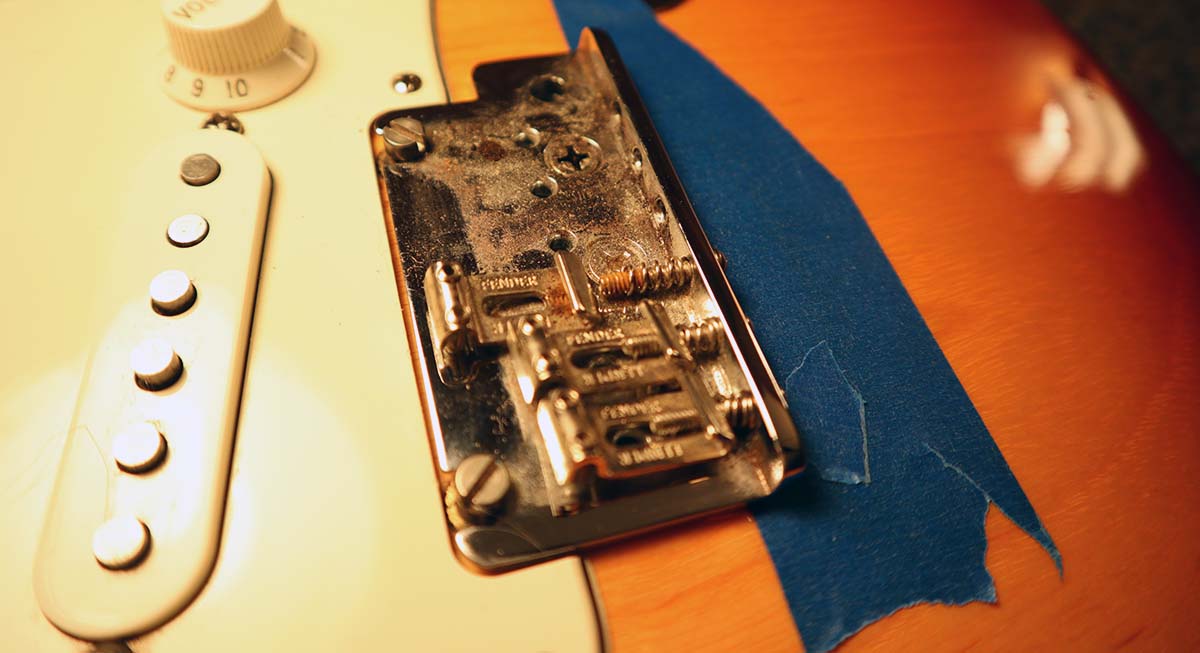
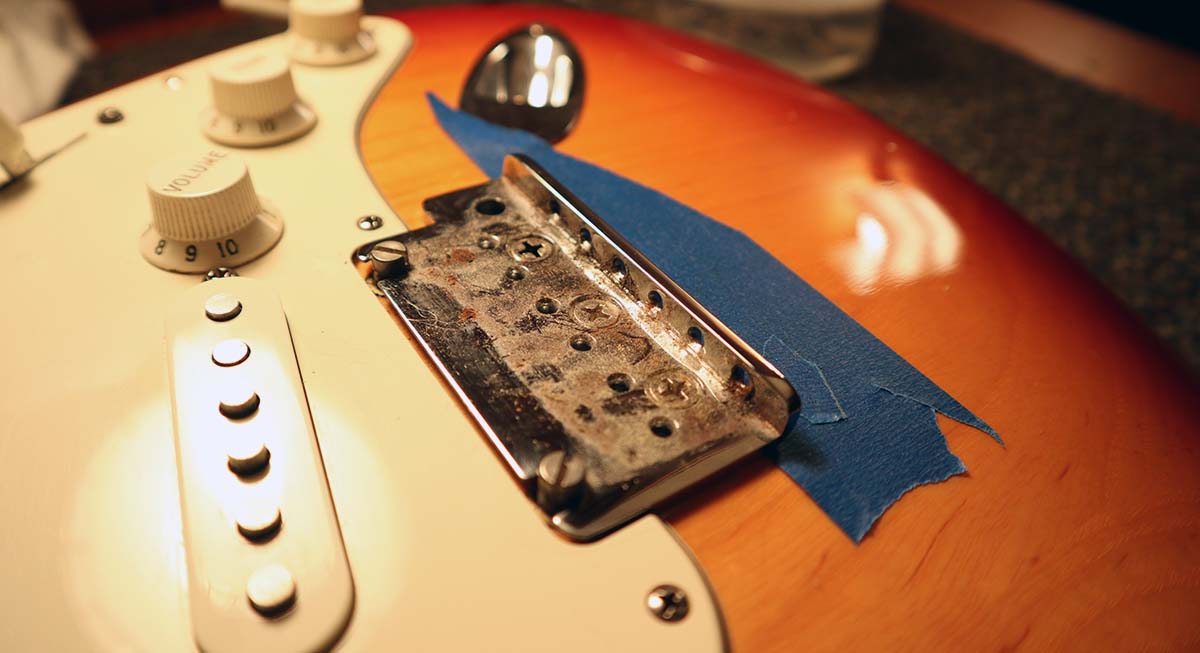
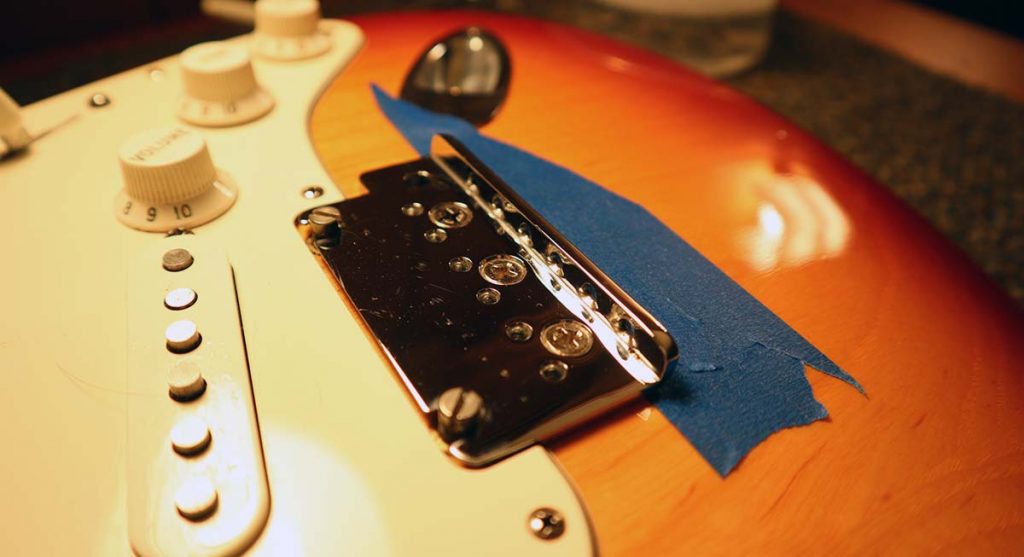
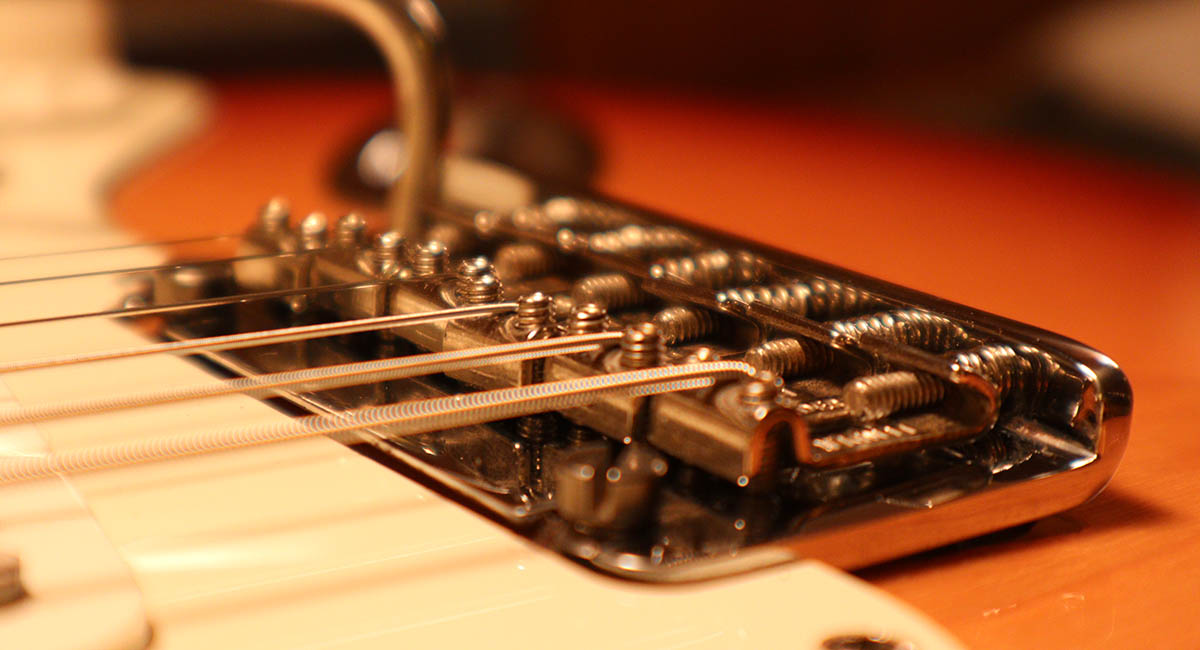
The pieces of my Strat’s bridge are starting to get pretty gnarly. Before I remove any pieces I take some photos. These small pieces are unique depending on the string and saddle, without photos it might be very difficult to figure out where everything goes.
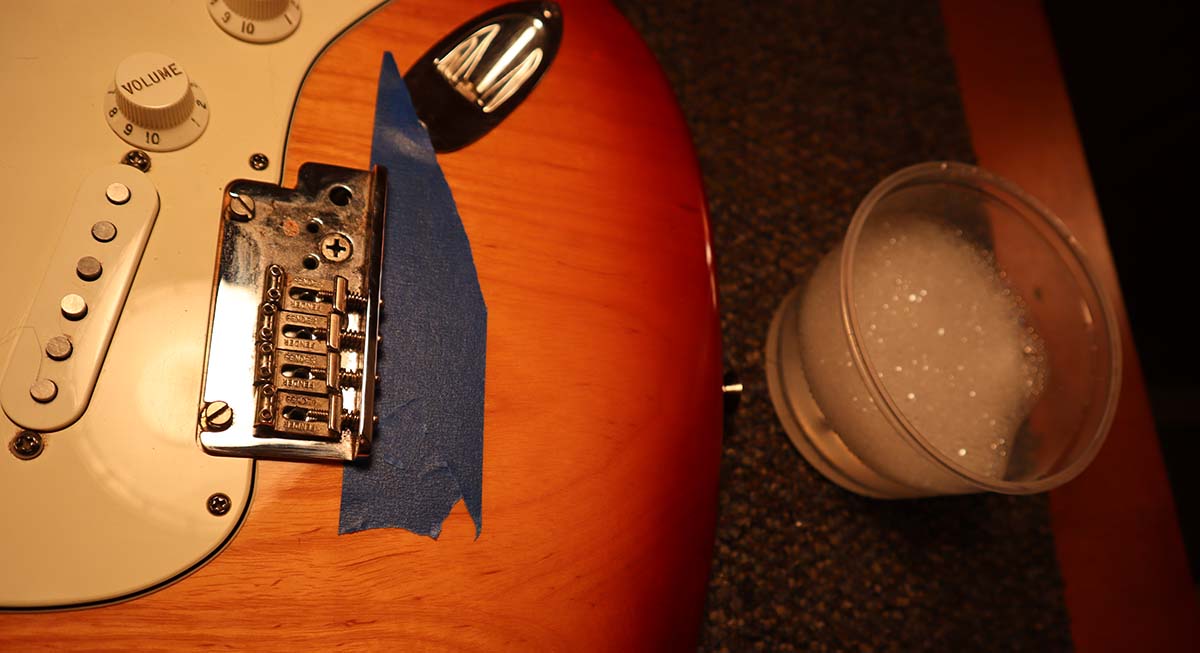
First I’ll remove the tremolo arm, then lay a piece of tape directly behind the bridge. I do this so that my screwdriver won’t scratch the top of the guitar if I slip.
My saddle pieces have some dirt and grime on them with a slight bit of corrosion. If not cleaned, this corrosion can spread rusting the saddle set screws and intonation screws entirely. If this is the case they’ll need to be replaced. With regular detailing however, these pieces of hardware should last a lifetime.
If the set screws are really stuck, don’t force them as you’ll most likely end up stripping the head of the screw either with the screwdriver or allen wrench. Use a small amount of WD40 to start to lubricate the pieces enough to get them apart.
For cleaning I just use hot water and a tiny bit of dish soap. This soapy mixture cleans all the grime from the parts and loosens any rust that is starting to develop. We’ll make sure these pieces are nice and dry before putting them back on the guitar.
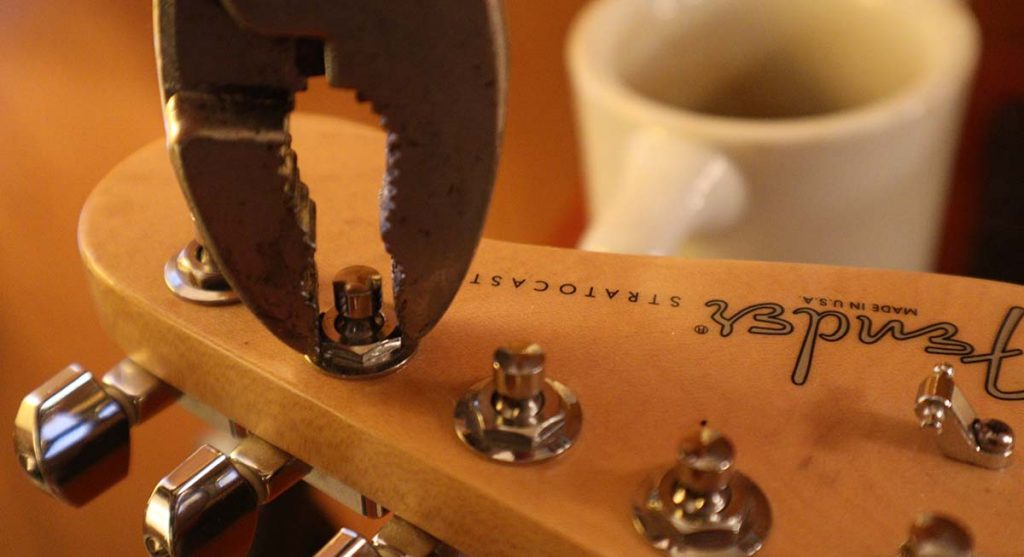
Clean the fretboard with steel wool, vacuum your surface to get all of the metal fibers, and condition the fretboard with fretboard oil. Clean the headstock and those dusty spots around the tuners. With your pliers make sure that the tuner hardware is tight.
Now pull all the saddle parts out of the soapy water and remove the last of the grime. I like to use toothpicks for the hard to reach areas. I didn’t remove the saddle height screws, so now I’m going to work them all back and forth to make sure they move freely and aren’t starting to corrode.
Now put the bridge parts all back together using your photos as a reference if need be. Note the general shape of the saddle position, roughly set them here and we’ll adjust later. This gets us in the intonation ballpark.
Note also the saddles and their corresponding strings. My Strat uses shorter set screws on strings 1 and 6 while strings 2-5 are the same. These details are where pictures beforehand make a big difference.

Restring, Stretch and Tune
With the guitar now clean, it’s time to put the fresh set of strings on it. Restring, tune, and then stretch the strings. If you haven’t stretched strings before, you can see some photos in my step by step guide to changing acoustic guitar strings. This is an important step when changing strings on any guitar, but especially important on a guitar with a floating bridge as small adjustments in tuning or string tension make a big difference on the bridge setup.
As strings age you may notice your floating bridge moving, this is a sign that it’s time to swap strings, not adjust the bridge.
I’m moving down a gauge from 11s on my Strat to 10s. If you’ve read Choosing the Right Electric Guitar String Gauge: or Why I Love 11s you’ll know that I’ve been playing pure nickel 11s for a long time. I love the sound of pure nickel as they have a mellow bluesy tone that sound incredible. However, I’ve been playing a lot of funk lately and like 10s for fast rhythm and the nickel plated steel offers a great brightness and articulation that pure nickel strings lack.
The change from 11s to 10s means less tension on the bridge which in turn means I’ll have to adjust the bridge tension springs in order to get the bridge back to where I like it.
Make sure to retune after every adjustment you make. Adjust bridge springs? Retune. Adjust saddles? Retune. The setup of the guitar is completely dependent on the tension on the strings, and this is exacerbated by floating the bridge.
Straighten Neck
Now it’s time to make our first neck adjustment. We’re going to straighten the neck and then slowly add relief back into it. Don’t worry about getting it perfect at this point. We just need to remove the relief.
For more information on Correctly Adjusting the Truss Rod in Your Guitar’s Neck, check out that article.
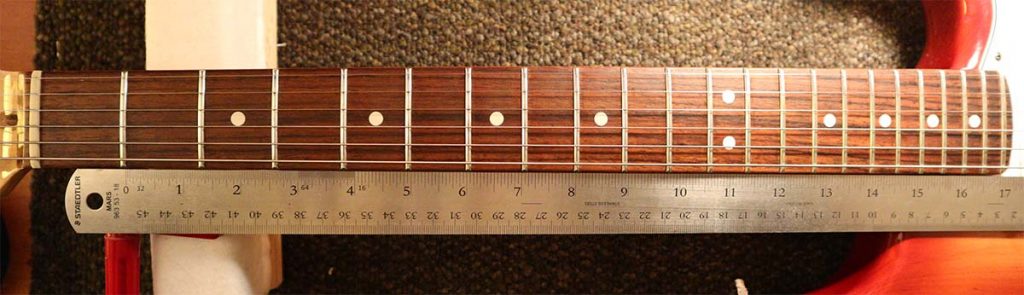
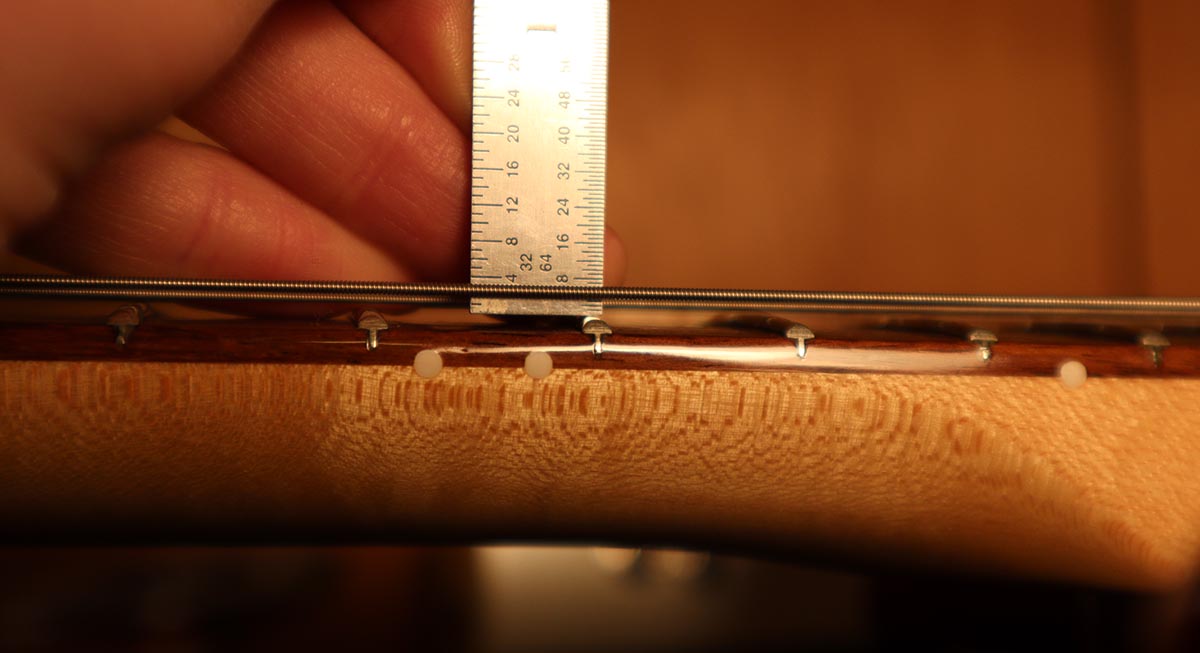
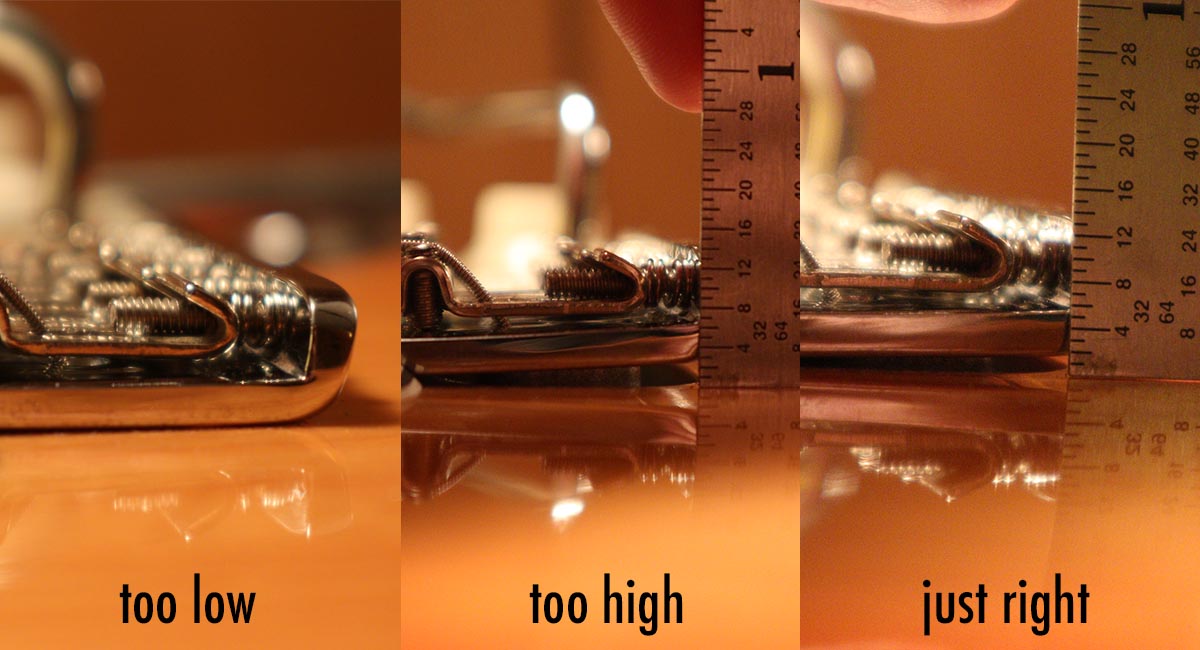
To adjust the truss rod, first measure the neck relief. Neck relief is measured by capoing the first fret, then holding down a fret near the end of the fretboard, finding the halfway point between the first capoed fret and the fret you’re holding down, and measuring the distance with a feeler gauge between the top of the fret and the bottom of the string.
There are multiple ways to measure this, but this is the method I like the best. On my Strat, the distance between the 1st fret and the 20th fret is exactly 16 inches. I’ll put a capo on the first fret and then hold the 21st fret (on the right side of the 20th fret) and measure the neck relief at the 8th fret which is exactly halfway between the 1st and 20th fret at 8 inches.
It’s common practice to capo the 1st fret and press the fret where the neck meets the body. Read more about this technique and how to find the right way to measure the neck relief on your guitar in the article above.
Adjust Saddle Heights
Next we’re going to get a rough height adjustment on our saddles before we set the bridge tension.
You can do this with a string radius gauge, or just set the height of each string individually. That’s the way I’m going to do it here. Start with the high e string farthest away from you and work towards the heavier strings.
Measure between the top of the 12th fret and the bottom of the string. I’m going to set mine at 3/64ths on all strings. On my Strat, the saddle height screws are serviced with a small allen wrench, however a small standard flathead screw is not uncommon.
If your saddles have two set screws (most of them do) make sure that they contact the bridge plate evenly and that the top of each saddle is parallel to the top of the guitar. You do not want the tops of the saddles to match the radius of the neck.
Again, this is a rough starting point that will get the guitar in a playable spot so that we can continue setting up the rest of guitar.
Retune and double check the measurements making sure the strings even across the fretboard.
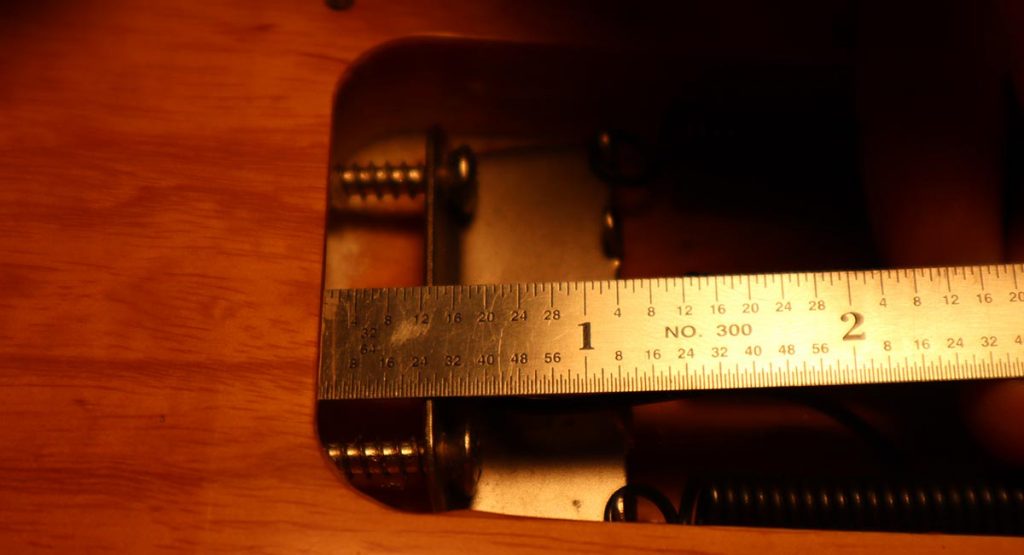
Set Bridge Tension
Now that the neck is straight and the saddles are roughed in, it’s time to set the tension of the bridge. I like my bridge to float which allows for a vibrato effect from a very light touch.
This is a hotly debated topic, one that is completely up to you as a player. For more info read Strat Tremolo: Float vs. Deck vs. Block.
Because this guitar was previously setup with 11s, the tension with 10s is going to be less which means that I’m going to have to loosen the bridge springs in order to get my bridge to float where I want it to.
First we’re going to set the pivot screws at the front of the bridge. My Strat has the American style of bridge which only has two pivot points. If your Strat’s bridge has 6 screws, raise the middle 4 so that they aren’t affecting the height of the bridge, now set the outside two screws like I am here.

The most stable position for the bridge is with the top of the bridge plate to be parallel to the strings. This is especially true for a Floyd Rose, but with a Strat trem we have a little more freedom. I like my bridge to be parallel or tilted forward just slightly. The greater the angle between the bridge and the strings, the more sensitive the touch on the trem will be.
I had to loosen the bridge tension springs significantly in order to get the back of the bridge to come off the guitar to the right spot. I’m looking for 2/64ths of space between the bottom of the bridge and top of the guitar.
Continually retune as you make adjustments as this will make a huge difference in where the bridge is floating.
Action Vs Playability
At this point the guitar is configured correctly for us to start adjusting the playability or action. Action is often used synonymously with the measurements of string height from the fretboard. While I’m not going to argue whether that is right or wrong, I’m not going to describe the guitar’s action as being 3/64ths for example.
Action describes the playability of the guitar with such scientific words as slinky, stiff, bendy, high, low, etc. There is an important lesson here which is that Action describes Playability not measurements. What I’m getting at is that you shouldn’t set your guitar to certain specs expecting a certain action.
In fact, I only check the specs after I’ve set the guitar to its most playable configuration. Set your guitar up by feel, not by numbers.
Set Playability At Upper Neck

Now for the fun part, it’s time to start adjusting the playability of the guitar.
The upper fret range from the 12 fret up is adjusted largely by the height of the saddles. I want the strings to be as low as possible while still being easy to bend. If the strings are too low they might play fast, but feel very stiff when bending. If the strings are too high then they will be easier to bend but might be hard to play fast lines.
If you bend a lot and rarely play fast lines you might like your strings a bit higher. If you rarely bend, use the classical vibrato technique, and play fast lines then you may like your strings much closer to the fretboard. Lower isn’t always better when it comes to guitar setups.
The 3/64ths we originally set will have changed now that the bridge tension has been adjusted. Because I want to find the middle ground where bending is easy at the lowest possible height, I’m going to bend the top strings (e, B, G) and adjust the saddle heights until it feels good.
Because I rarely bend the lower strings, I can usually get those a bit closer to the fretboard. This is where a radius gauge can be very handy. You simply set the low E and high E string heights then match the radius of the strings to the gauge using the outer strings as guides. Otherwise, simply measure each string at the 12th fret and set their height accordingly.
Play slowly in each position and each note on every fret. Make sure that the notes are clear with no buzzing. If you do encounter buzzing, raise that saddle until you no longer hear the buzz. Excessive string buzz indicates high or low frets which need to be handled carefully.
Only attempt fret work if you are confident in your abilities. Messing with frets and quickly lead down a rabbit hole where you end up chasing a buzz and removing too much fret material all over the neck.
Once this position feels good to you it’s time to move on to the middle of the neck.
Set Playability in the Middle of the Neck
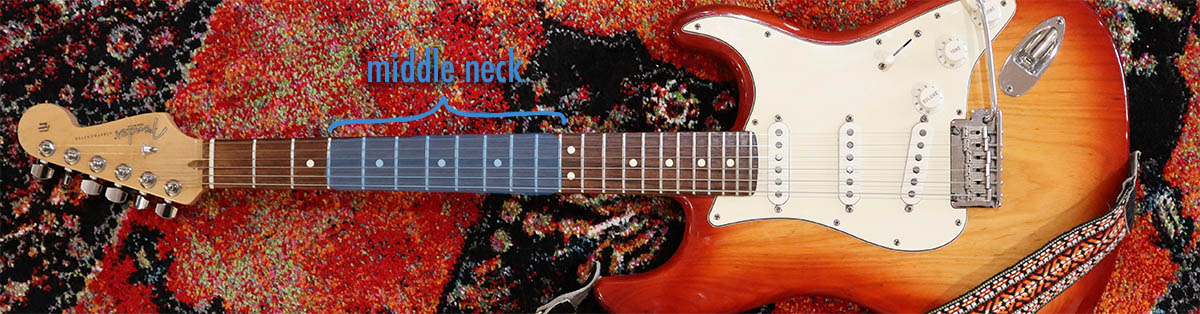
The next area to work on is the middle of the neck. I consider this from the 3rd fret up to the 12th fret.
Bend the same strings that you did in the previous step, but do it at the 7th fret. The idea is to get that bend to have the same tension and feel all over the neck. This is one way to look at a guitar setup. The goal is to create equal tension across the neck no matter how high the strings are off the fretboard.
If the tension of that bend feels tighter than the one higher up the fretboard, we’re going to add relief into the neck using the truss rod. Loosen the truss rod by turning left (lefty loosey), then add slight back pressure to ensure the truss rod doesn’t loosen on its own.

Bend the strings again, feeling for the equal tension across the neck. Adjust the truss rod as necessary. Play single line licks, bends, slides, scales, etc ensuring that the guitar plays smoothly, the strings are at a comfortable height off the fretboard, and bending feels similar, tension-wise across the neck.
While high string action (strings higher off the fretboard) may make bends feel super slinky, other aspects like slides and single note lines will suffer because of the string height. It’s our job to find the middle ground where the tension is equal to that farther up the neck while keeping the guitar as playable as possible.
Set Playability Near the Nut
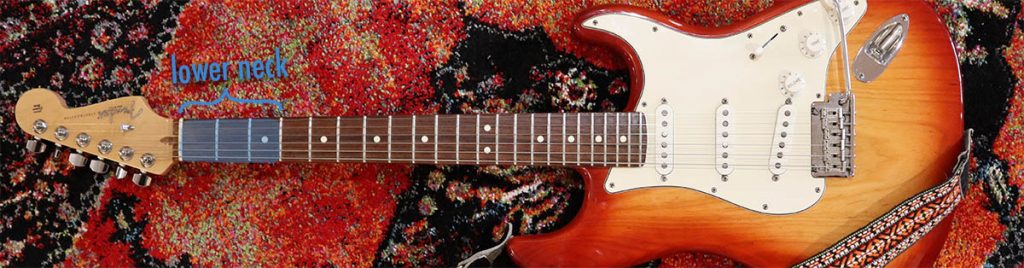
The final area of the neck to set playability is the first 3-4 frets. This area is not directly affected by the saddle heights or truss rod, but by the depth of the nut slots. In the same way that we raise and lower the bridge saddles to control the string height and tension on the upper neck, we raise and lower the nut slots to do the same at the lower neck.
Slotting and refilling the nut isn’t particularly difficult, but it does need to be handled correctly. Check out Setup Like A Pro: How to Correctly Slot and Refill a Guitar Nut.
Down this far on the neck I’m not too worried about bending being easy, cause no amount of work will get it to feel slinky down there. With the nut, you want the slots to be even across all strings avoiding one string being higher or lower than all the others.
The main thing to look for in regards to nut height is intonation issues. If the nut slot is too high, this causes the string to be higher off the fretboard, requiring more force to fret the note correctly. With excessive force, the notes will be bent sharp.
Before making any adjustments to the nut height for intonation reasons, go on to the next step to set the intonation at the bridge. After intonation is set, we’ll check it at frets 1-3 and make adjustments to the nut if necessary.
Wrapping up the Playability Adjustments
After making adjustments for playability in the upper, middle, and lower areas of the fretboard, take your time to play across the entire neck. Check every fret for buzz, play scales and lines that traverse the entire fretboard, and finally bend strings in the manner which you normally would and make sure string tension feels even in all positions.
Slight adjustments may need to be made to the truss rod or saddle heights, but remember that any small change will have effects on other areas of the fretboard. Any adjustments made at this point should be very slight, just some fine tuning to get any last kinks out.
Set the Intonation
Now that the playability of the guitar has been dialed in let’s move to one of the final touches, setting the intonation.
Intonation on a guitar describes the string’s ability to stay in tune as you move up the fretboard. The best way to set the intonation is to get it in tune with your clip on tuner, then fine tune it using your ear.
The ear is much more accurate than most tuners and not only is this great ear training, but will provide dead on intonation. As mentioned at the beginning of this guide, a fresh set of strings is essential for a proper setup, especially when it comes to intonation. One of the main reasons for intonation being off is an old set of strings. If you don’t have a fresh set of strings on the guitar any intonation adjustments will be incorrect.
To set the intonation, follow these steps
- Set the intonation one string at a time starting with the high e and working toward the low E. Tune the open string to an e.
- Play the harmonic on the 12th fret by lightly touching the string (not fretting it) right above the 12th fret, picking the string while simultaneously letting off the light touch on the other hand.
- Listen carefully to the pitch of that note. Now fret the note normally with just enough pressure to get a clear note. Listen carefully for the difference between the two notes. The harmonic is your reference note and the goal is to get the fretted not to match the harmonic.
- If the note is sharper than the harmonic, lengthen the string by tightening the saddle’s intonation screw (righty tighty).
- If the note is flatter than the harmonic, shorten the string by loosening the saddle’s intonation screw. I remember this with “Shorten to Sharpen.” If you want to make the note sharper, shorten the overall length of the string. The opposite is true if you want to flatten the note.
- Retune the string after every intonation screw adjustment.
- Repeat steps for all strings.
Intonation can also be thrown off by nut slots that are too high. This forces the player to press down further on the string in order to make contact with the fret which in turn pulls the notes sharp. In order to check if the nut slots are too high, this follow these steps.
- Tune the string starting with the high e and working towards the low E.
- Fret the high e string at the first fret with just enough pressure to make the note ring clearly.
- This is an F and should be registering as such on the tuner.
- If the note is sharper than it’s supposed to be, the nut can be slotted further in order to bring the string closer to the fret.
- Repeat for all strings keeping nut slot depths even across all strings.
Be very careful not to take too much material off the nut if you are increasing the nut depth. If changes are being made, bring that string back up to tension and play that string open making sure no fret buzz is present. If too much material is taken off it will have to be filled and reslotted. For more information see the tutorial dedicated entirely to nut work: Check out Setup Like A Pro: How to Correctly Slot and Refill a Guitar Nut.
Set Pickup Height
The final step in our setup is to adjust the pickup heights. While this isn’t something that needs to change often, new string gauge, string material, or even just slight action changes will affect the guitar’s sound.
For a guide on setting electric guitar pickup height read: Setup Like a Pro: Correctly Adjust Pickup Height on Electric Guitars
Final Playthrough
The final step is to plug your Strat in and play it! Spend some time moving around the neck, playing licks, playing chords, etc. Make sure everything feels good and if not get it back on the bench for some minor adjustments.
I hope this guide was helpful. If you have any questions please leave them in the comments below and I’ll address those.
I enjoy the challenge of setting up a Strat every single time one is on my bench. Learning how to set one up properly will give you a better understanding of your instrument and save you some money in the long run.