
Changing the strings on your acoustic guitar can seem pretty intimidating at first, but once you get the hang of it you’ll be changing your strings like a pro. Changing guitar strings is an essential skill for all guitar players, and a great way to get to know your guitar if you’re a beginner. Follow this guide and you’ll know how to change strings the right way. You’ll also know how to avoid the common mistakes many people make when restringing their acoustic guitar.
Tools for Changing Guitar Strings
These are the basic tools you need to change the strings on your acoustic guitar.
- String Winder & Snips
- Polishing Cloth (don’t buy polishing cloths!)
- Guitar Cleaner & Fretboard Oil
- 00 Steel Wool
- Painters Tape
For additional tools that make changing strings and working on guitars much easier, check out the Additional Tools section at the bottom of this page.
Step-by-Step Guide To Changing Acoustic Guitar Strings
1. Set up your workspace
First you want to set up your workspace. Make sure that you have a large clean area that will allow you to move freely around the instrument.
I built a standing workbench which I have covered with carpet remnants. This is perfect for working on guitars, amps, and other projects. If you don’t have a workbench like mine, a great alternative is a kitchen table or even a freshly made bed.
If you’re using the kitchen table, lay a large clean towel down first. If you don’t have something to support the neck, take another clean towel and roll it up, you want enough clearance that the headstock is off the workspace by about 3 inches.
Get all of your tools ready and within reach. Ok, let’s get started.
2. Remove guitar strings

Now you’ll want to remove all of the strings off the guitar. Yes, it’s ok to take all of the strings off the guitar at the same time. Release tension on the strings slowly by detuning each string a couple steps before moving to the next one.
Once all tension is off the strings, cut them in the middle with your snips. This makes pulling the strings out of the tuners and bridge quicker and more manageable.
There’s a sneaky feature of every string winder that I’m embarrassed to say took me way too long to find. The slot allows you slide under the bridge pin and leverage it out without damaging the pin, the bridge, or the finish of the guitar top.

IMPORTANT: Make sure to keep all of your tools and parts within sight and away from the guitar. Keep containers to put small parts in so you don’t lose them, or let the get under the instrument where they will most likely cause damage.
Now, wrap up all the loose used guitar strings and throw them away. Don’t use old strings for decoration or jewelry. That’s disgusting. Strings are filled with oils and dead skin from your fingers. No, used guitar jewelry is not cool, it’s gross. If you’re dead set on making jewelry from guitar strings (which I still think is a bad idea, if you couldn’t tell), just buy a new set. They’re really not that expensive.
Help, I can’t get the bridge pins out! Bridge pins are just held in place by the tension on the string and a bit of friction. If they haven’t been removed in a very long time they might get stuck and could be very difficult to remove. If you can’t get a bridge pin to come out, don’t try to force it. With the strings loosened all the way, reach into the guitar and push the pin up from the inside of the guitar. Most of the time this will get the pin out right away.
I’ve got a larger pair of snips I use for clipping fret ends that works great for getting pesky bridge pins to move. However, a good repair guy can either get it out for you, or worse case scenario drill it out and replace it with a similar pin. Whatever you do, don’t push a pin or fragment of a pin down into the guitar. These string holes and tapered, and doing so will damage the bridge, bridge plate, and top wood.

3. Check the condition of the frets
With the strings off the guitar, this is a great opportunity to really check the condition of the frets. Make sure there aren’t any nicks, deep grooves, or flat spots forming on the tops of the frets.
Feel alongside the edges of the frets where the fret ends meet the edge of the fingerboard. You shouldn’t be able to feel any sharp edges here, and the fret ends should be flush with the edge of the guitar neck.
If you can feel sharp edges here, most likely the guitar’s neck wood has started to dry out a little bit. This is a great indication of a guitar that isn’t getting enough humidity. Check out the article on guitar humidity and make sure that your acoustic is getting the water it needs to be happy and continue playing well.
If you see other fret issues like I mentioned above, note where those are and take your guitar to a qualified tech. They’ll be able to tell you if repair work needs to be done and how much it will cost.
While frets aren’t meant to last forever, they do last a very long time so don’t expect to be having repairs done to your frets at any regular interval.

4. Clean the headstock and by the bridge
Here’s another way to know if you need to change your strings: is there a layer of dust under the strings on the headstock? Your guitar shouldn’t look like the inside of the Munster Mansion.
With the strings off the guitar, clean the headstock, and make sure that all of the nuts around the tuners are tight. Tighten gently if they are loose, taking care not to over-tighten or mar the finish on the headstock.
Another place on the guitar that doesn’t see a lot of love is under the strings in front of the bridge. Clean this area well.
5. Clean frets and fretboard with steel wool

You don’t need to do this every time you change strings, but if there is any visible buildup on the fretboard or around the frets, steel wool does a great job of taking that off while polishing up those frets.
Don’t let this gunk buildup. I know some guitar players who use these caked on layers of oil and dead skin cells as some sort of foul medal of honor. This is gross, very gross.
If it’s really bad, you can take a straight razor blade and pull it perpendicular to the fretboard. This protects the wood from the sharp blade, and also scrapes all the junk up off the fingerboard.
Now use some 00 or finer steel wool to clean the fretboard. Get right next to the frets to remove all of the buildup.
When you’re done with this step, vacuum up the metal that has come off the steel wool. If the guitar slides around on this it can scratch the finish. Also, your housemates probably won’t be too stoked about steel wool remains all over the kitchen table.
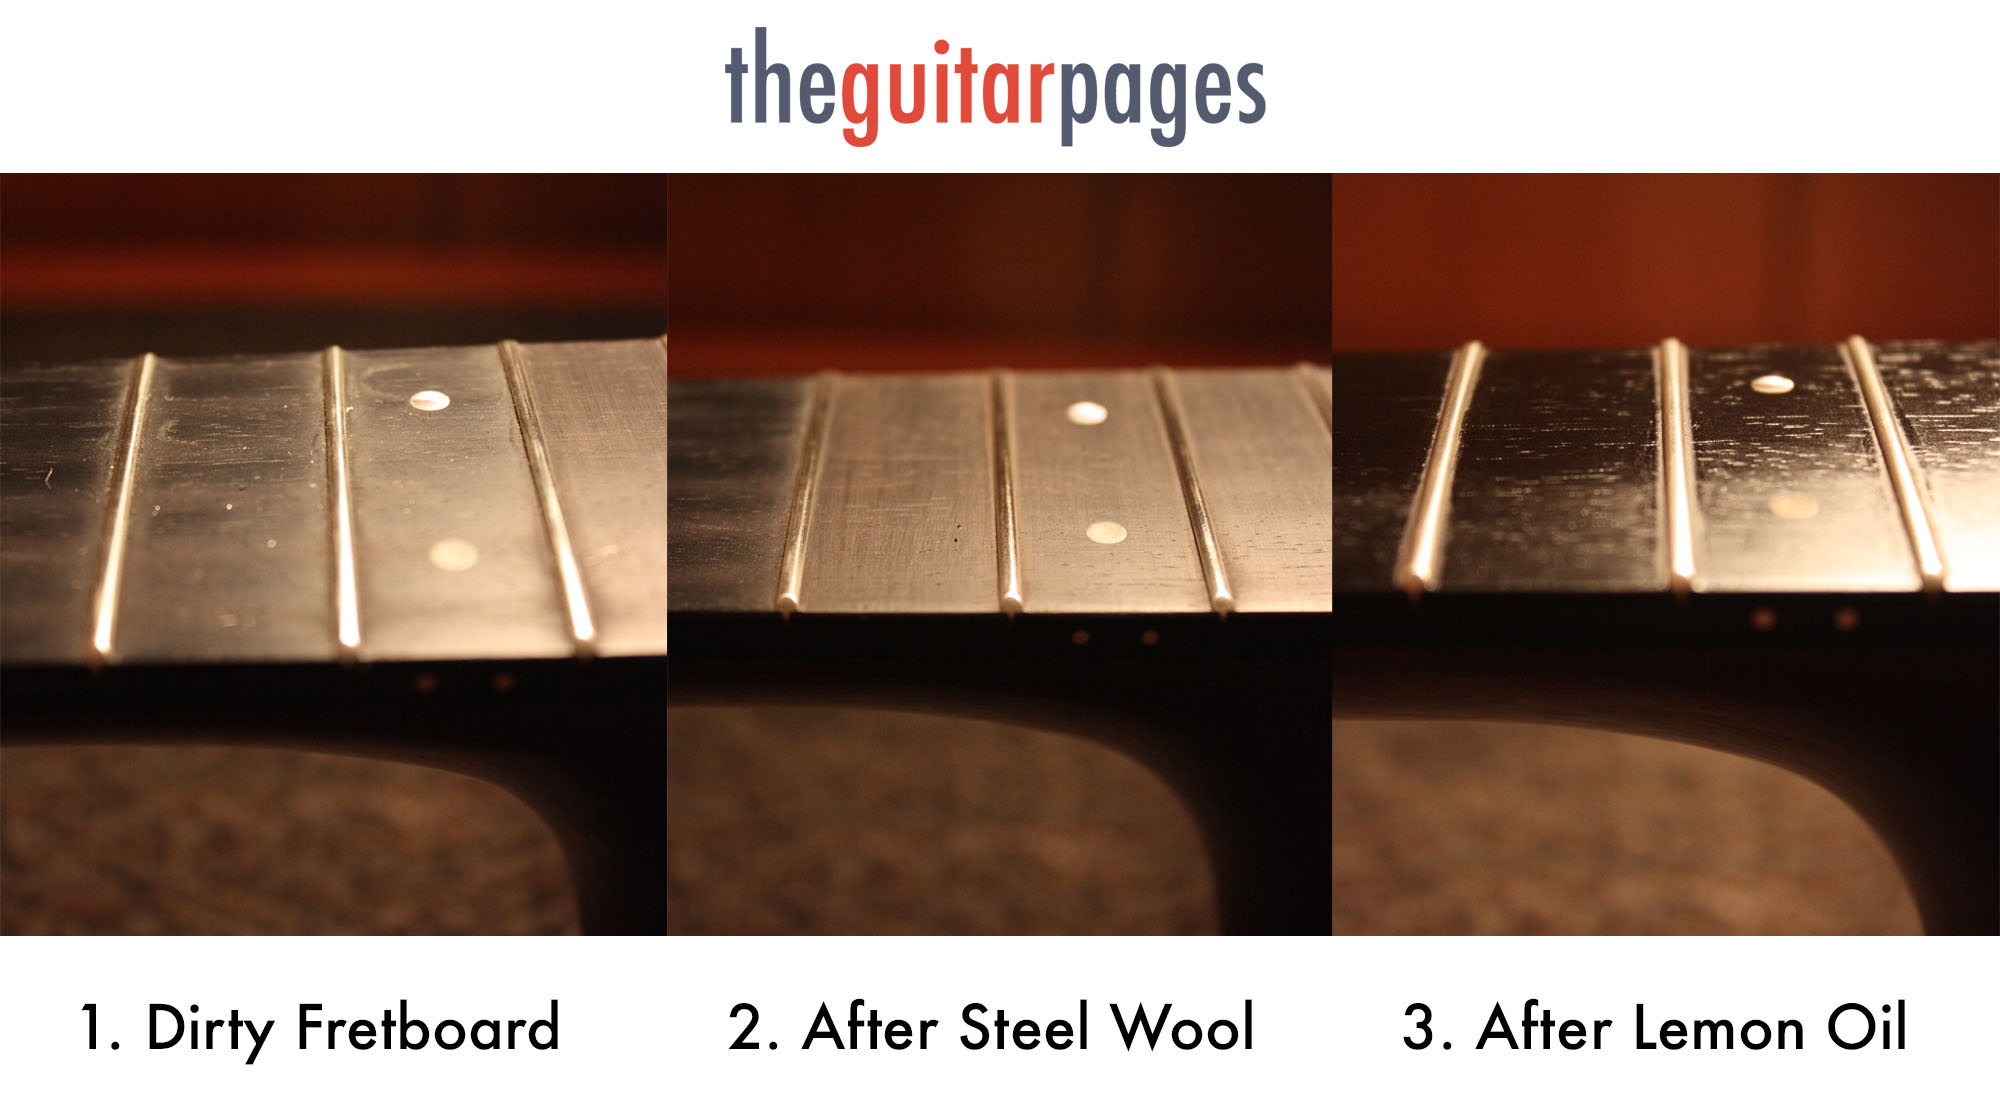
6. Oil fretboard
I use the Dunlop 65 Lemon Oil for reconditioning fretboards. Apply as shown above. You really don’t need much of it, and a little goes a long way.
Begin to rub the oil into the fretboard. You’ll be able to feel it start to warm up from the friction of your fingers. This is what you want. As the fretboard warms up, it expands and allows more of the mineral oil to reach the deeper grains and fibers of the wood.
Once you’ve rubbed the oil into the fretboard, wipe off any excess from the board and your hands. You don’t want to immediately transfer all that oil to the new strings.
7. String Guitar
It’s time to put the new strings on the guitar. It doesn’t really matter where you start, but I always start with the low E string and work away from myself.
Pull the string out unwind it carefully. These things can whip around and if you’re not careful a loose end can hit the guitar body and scratch it.
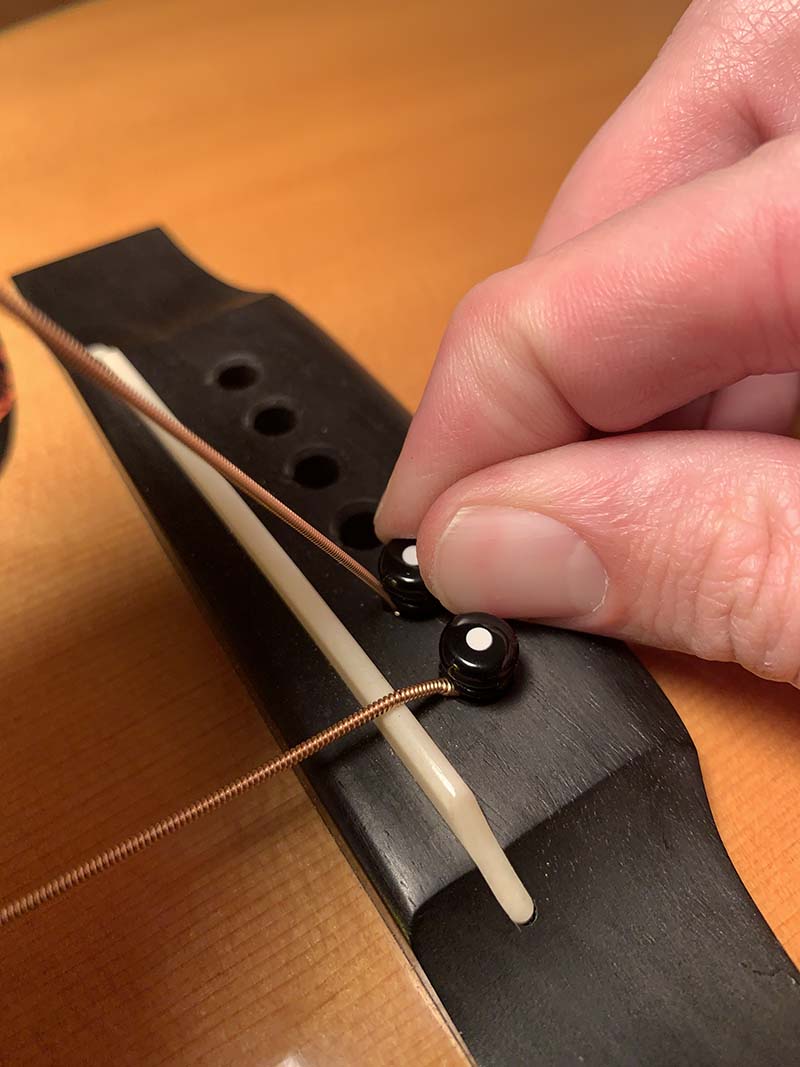
Stick the ball end through the bridge hole and follow it with a bridge pin. Make sure that the bottom of the bridge pin is touching the ball of the string. Line the groove of the bridge pin up with the string. This is very important and allows the ball of the string to sit properly against the bridge plate.
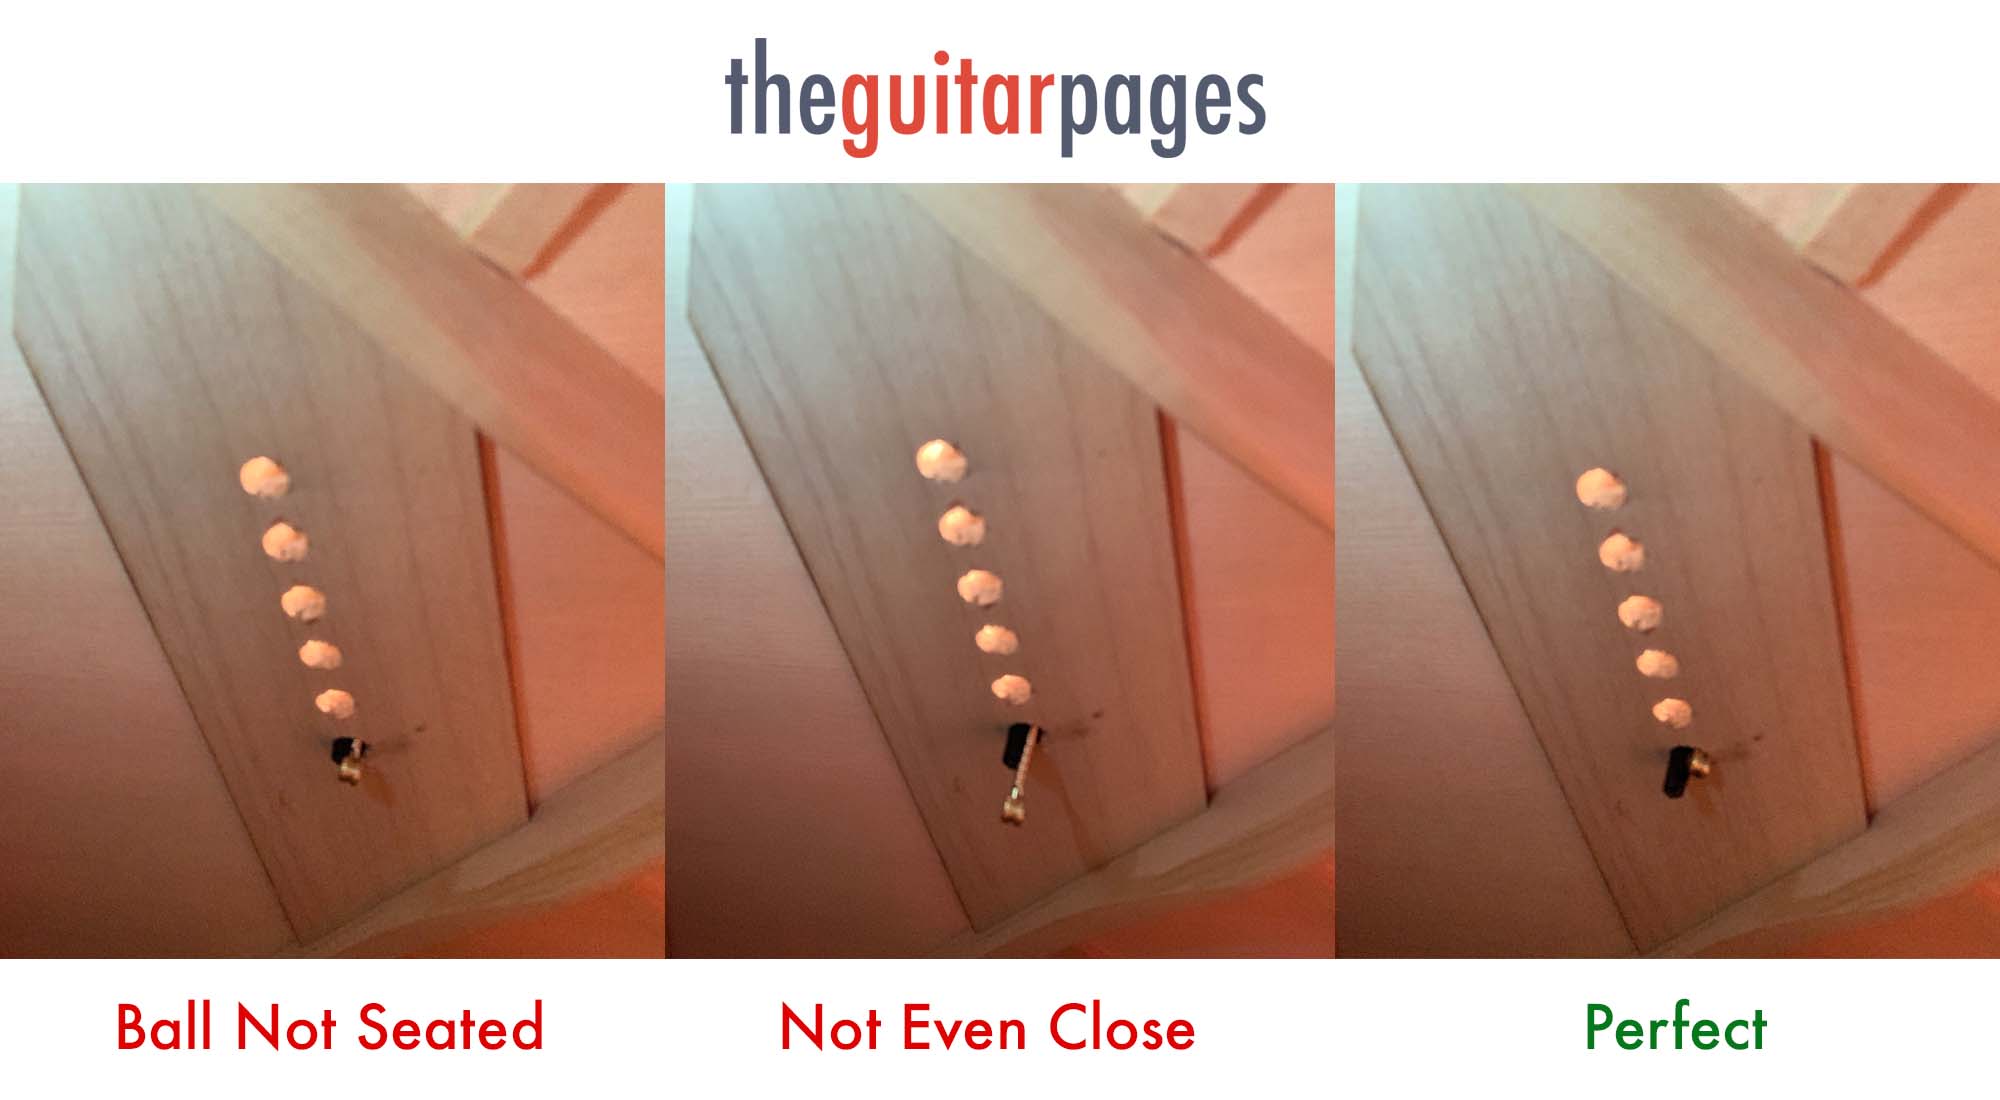
Once the bridge pin and string are in the string hole, push gently on the bridge pin while pulling up on the string. The goal here is for the ball of the string to be seated snugly against the bridge plate, as shown below.
If the ball of the string isn’t seated correctly, damage can be caused to the bridge plate when you start tightening the string. Either the bridge pin will come flying out of the guitar hopefully missing your eye, or the ball will slam against the bridge plate causing damage that can be difficult and costly to repair.
If there’s any doubt, feel for the ball of the string through the sound hole, or use a phone camera or mirror to make sure the bridge pin and string are positioned correctly.
8. Styles of string wraps around tuner posts

There are a handful of ways to wrap strings around the tuner posts, but I’m going to show you my favorite.
First, line up the string hole in the post with the string coming down the neck. Stick the string through the post and bring it tight. Hold the string at the next tuner (about 1.5 – 2 inches past the tuner the string is going through), while pinching the string bring it back to the tuner so that there is now slack in the string.
Switch hands so that your right hand is pushing against the string, helping it bend as you wind it. Wind the string with your left hand.
On the first time around the post, pass the string over the hole. On all subsequent wraps, go below the post. By managing the string wraps this way, you’ll end up with the perfect break angle of the strings over the nut.
What is the break angle? That is the angle that the strings make when they “break” over the nut. It’s important to maintain a good angle or else you’ll end up with unwanted sounds and overtones on open strings. The best way to insure a good break angle is to follow the steps above and make sure that your string wraps around the tuner post are going down. They have to go down. If the string wraps are going up the post you’re in for a bad time.
Continue with the rest of the strings, always making sure that the strings are wrapping around the post from the inside of the headstock to the outside like in the picture below. If your guitar has six tuners on one side, then they all wrap the same direction.
Now, clip all the strings close to the tuner so they don’t catch on your shirt or poke holes in your fingers. A good goal is to keep the bleeding on the guitar to a minimum.
10. Properly stretch the strings
We’re not finished yet! Next, using a good clip-on tuner, tune the strings up to pitch. Now with both hands, stretch the strings by bending them between your thumb and first two fingers. Move up and down the string. Then tune the string back up to pitch. You’ll have to repeat this process at least 3 times before the string has been fully stretched.
Ok, now we’re all done! Sit back and strum your favorite chord, enjoying the amazing sounds of crystal clear new strings. This is one of life’s simple pleasures, the sound of fresh strings on your beloved guitar.

Common Guitar String Questions
How Often Do You Need to Change Acoustic Guitar Strings?
You should change your acoustic guitar strings when they don’t stay in tune, have poor intonation, or sound dull.
If you tune your guitar, and a minute later it’s out of tune again, your strings are old and need to be replaced.
If you are playing chords and notes up the neck and the notes at the 7th fret are out of tune but when you check the open string it is in tune, your strings aren’t holding intonation and need to be replaced.
If your guitar sounds like someone is trying to smother it with a pillow while its sleeping, then your strings are dead and need to be replaced.
These are all important sound based and ear training related reasons, and may be difficult to pinpoint as a beginning guitar player. A good rule of thumb is to change strings at least every 3 months or 4 times a year.
Now if you’re playing a lot then that will increase considerably. When I’m playing my guitars a lot I change strings about every 3-4 weeks.
How Often Do Pros Change Strings?
Pro musicians change strings very frequently. As brand new strings are much less likely to break, musicians playing live are going to most likely be playing on strings that are either brand new or close to it.
Tommy Emmanuel, for example, puts a new set of strings on his guitar before every show. For him, that could be every single day while he’s touring.
Signs That Your Strings Need To Be Changed
I mentioned sound, tuning, and intonation as signs for needing to replace your strings. Here are a few more.
- Won’t hold tune
- String doesn’t maintain intonation up guitar neck
- Strings sound muffled, dead, loss of “clear” tone
- Strings begin to oxidize, darkening in color or even turning green
- Wound string wraps begin to loosen or are not uniform.
- Strings have been on the guitar longer than 6 months
- You bought a used guitar and don’t know how old the strings are
- The growth of gunk on the fretboard and strings is starting to gain sentience and won’t stop staring at you from the corner of your room.
Relatively speaking, strings are pretty cheap and buying them in bulk makes them even cheaper. Changing your strings often keeps your guitar cleaner, sounding better, and a great sounding guitar makes you want to pick it up and play it. Which is a win all around.
My go-to strings are the D’Addario EJ16 Phosphor Bronze 12-53 Light Gauge. If you buy them in a pack of ten, you save $1.50 per pack. That’s not a bad savings if you’re going to be burning through about that many in a year.
Should I just replace one string?
You can replace just one string when it breaks, but you shouldn’t. The only reason you should just replace one string is if it breaks immediately out of the package and all the other strings are brand new.
Most of the time, single strings are $2 per string anyway, so a brand new pack is not much more. Just replace them all and now you have a whole set that all sounds bright and sparkly instead of one string leading a pack of weary, haggard, gremlin strings that need to be put out of their misery.
How long does it take to change guitar strings?
When you’re a beginner learning how to change guitar strings it might take up to an hour to figure it all out. Once you have been doing it awhile, it gets much faster. I have changed hundreds if not thousands of sets of strings, and I can do a full string change with a fretboard cleaning and condition in about 10 minutes.
I just bought a new guitar, do I need to change the strings?
That’s a great question, hey someone should write a post about that!! jk I already did. Click to read about changing the strings on a brand new guitar.
Additional Tools
These tools certainly aren’t necessary for changing guitar strings, but make guitar work and string changes much easier, quicker, and more enjoyable.
- Electric String Winder
- Neck Support
- Guitar Mat
- ShopVac