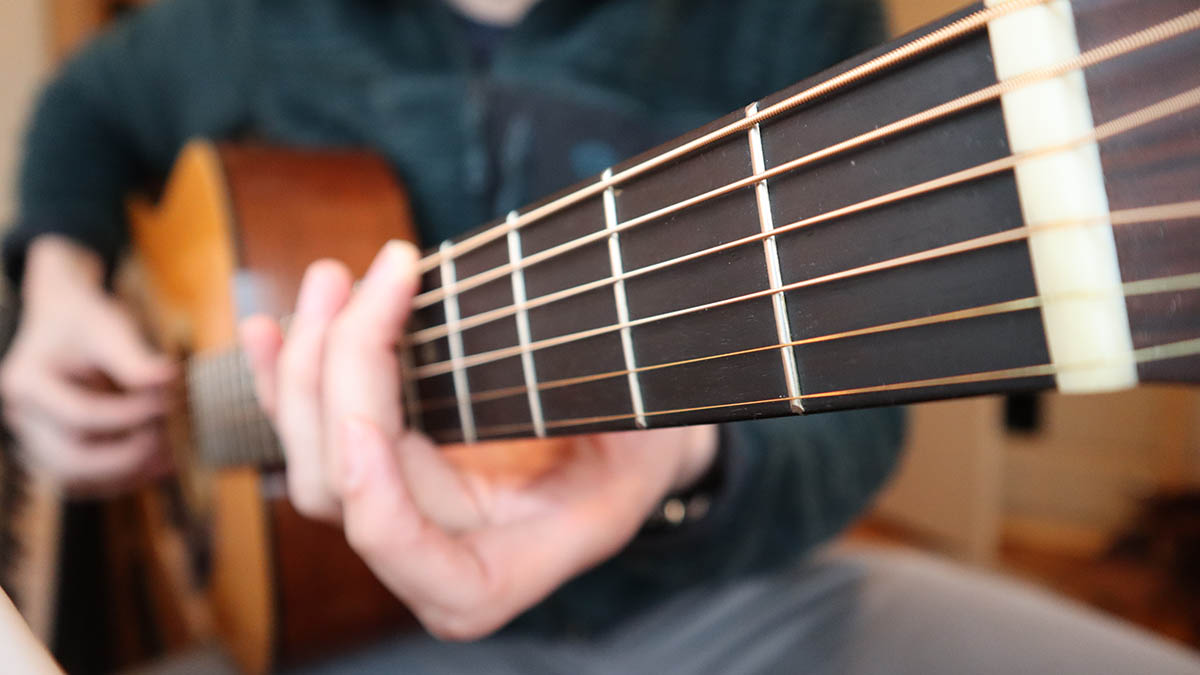
Even if you have a lesser expensive acoustic guitar, there are a handful of things you can do to ensure it will sound its best. Here are the 10 things you can do to make your acoustic guitar sound better. It’ll go from dead and flat to warm, rounded and articulate in no time.
It is true that you can only go so far without upgrading the guitar to something nicer, but I’ve had many guitars come my way that were thought to be useless when in reality they just needed a bit of love. Let’s dive in and get your acoustic sounding its absolute best.
Table of Contents
#1 Install New Strings
By far the most common reason that a guitar isn’t sounding its best is because of an old set of strings that need to be changed. Strings have a useful life and need to be swapped regularly to ensure the guitar will stay in tune, intonation, and have a decent tone.
As strings age and begin to oxidize, the ability to faithfully reproduce a note and its natural harmonics diminishes drastically. This leaves you with a guitar that is out of tune (even immediately after you tune it), and sounds dull or dead.
Guitar strings start to go bad as soon as they’re out of the package. Certain factors can speed up that process, like heavy playing or particularly destructive body sweat, but regardless the clock is ticking as soon as that new set of strings goes on the guitar.
How can you tell if your strings need to be changed? Check out my list of ways to tell here: How to tell if your strings need to be changed.
How often do you really need to change strings then? It’s more often than you think, but the plus side is that you can buy acoustic strings in bulk from Amazon. You save some money up front and then you always have a set when the old ones go bad. These are the strings I use, and I buy them in the 10 pack which is the cheapest per pack by far: D’Addario EJ16 12-53.
Read all about changing acoustic guitar strings in A Visual Step-by-Step Guide to Changing Acoustic Guitar Strings.
TIP: Set a date on your calendar, every 3 months, to change your strings. If you didn’t already change them in the last 3 months, then swap them out. No ifs ands or buts. Even if you didn’t play that much, the oxidation process has already made these strings a thing of the past. Plus, putting a new set of strings on a guitar always works to inspire me to play it more. So it’s really a win, win.
#2 Check Your Humidity
One of the best purchases I have ever made was a small hygrometer that fits inside the case of my Martin D-18V. These things are cheap, lightweight, and can tell you instantly if you need to humidify (or dehumidify) your guitar.

ThermPro Digital Hygrometer, Amazon
For more information about guitar humidification, check out my post about that Clouds or no Clouds: All You’ve Ever Wanted to Know About Humidity and Guitars.
Your acoustic guitar’s humidity should be in the 45% – 55% range. Now I live in the northwest united states where winter months can get incredibly dry. With a humidifier in my guitar case consistently getting refilled, I maintain about 37% humidity. While this isn’t ideal, it’s the best I can do in the climate that I’m in.
It turns out that acoustic guitars actually sound better the dryer that they are. When there is too much humidity in the air, the wood of the guitar can soak that up, creating a heavier wood fiber that isn’t light and responsive. Instead, a guitar with too much moisture in it will sound dull and dampened. The problem is that when a guitar gets too dry you run the risk of the top cracking, dropping, bridge separating, delamination, loose bracing, and a host of other issues.
The most important thing you can do to maintain an acoustic guitar is to buy a hygrometer and monitor the moisture closely. This is necessary for avoiding top cracks and other wood separation when it’s dry, and also avoiding oversaturation and issues like mold and bacteria from forming.
In dry climates like mine, it’s more common to see instruments that have been deprived of water. However, I have also seen guitars that have been exposed to too much water. Guitars with too much water sound like a waterlogged blanket and no amount of new strings can fix that. Keep a close eye on the humidity of your guitars. Kept in a good humidity range will guitar will sound the best it possibly can.
#3 Clean Your Acoustic Guitar
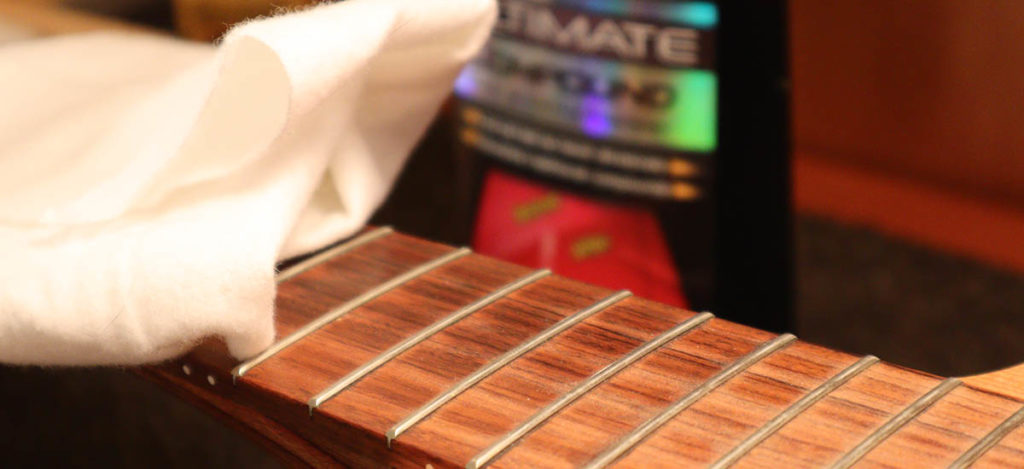
If cleanliness is next to godliness, then is guitar cleanliness next to rock godliness? While guitar players aren’t necessarily known for being the cleanest people in the world, a clean guitar will certainly sound better than one that’s caked with sweat and finger gunk from relentless rock and roll.
People obsess over the types of finishes on their acoustic guitars, and the world will seemingly not rest until the nitro vs poly debate is solved. While a lot of this argument is overblown, the idea is that a heavier finish with more layers dampens the natural movement and energy of an acoustic guitar top. If you have layers of arm sweat stuck to the top of your guitar then you might be suffering a similar fate. Use some guitar cleaner and a polishing cloth regularly to keep your guitar’s finish clean and clear of body oils, sweat, dust, blood (let’s hope not), etc.
The other spot on the guitar most affected by our bodies is the fingerboard. While some people keep their built up finger gunk as a source of pride, it really is gross and should be cleaned up every time you change your strings. Not only is it a borderline health code violation, excessive buildup of grease and oils from our fingers will dampen the sound of the strings and decrease the life of a new set of strings drastically.
Check out my Guide to Changing Acoustic Guitar Strings. In this visual, step-by-step process I detail how I clean and oil an acoustic guitar’s fretboard before restringing the guitar. (hint: you use a fine steel wool for bright polished frets and a completely clean fretboard).
Keep your acoustic guitar clean, and it will repay you by sounding crystal clear, warm and bright. Also keep your guitar clean because it will keep people from thinking you crawled out of a hole in your backyard. Yeah, the one behind the shed. We know about your hole back there Derek.
#4 Ensure No Fret Buzz
Fret buzz can be a real pain and kill any good tone coming from your acoustic guitar. Even if everything is right on a guitar, a little fret buzz can make the whole thing sound like metal trash can in a demolition derby.
To check this, tune up your guitar in standard tuning. No slowly and methodically play every note on the guitar. Listen carefully for notes that sound different, or tinny. This metallic sound is most often due to low or high frets. While fretwork can be done at home, this is typically a job for your guitar tech. If you’re not versed in fretwork, a small adjustment can leave you chasing that buzz all over neck and cause much more damage than when you started. Fretwork should be left to the experts.
If you do hear some nasty buzzing, don’t worry too much. While not good, buzz in an acoustic guitar isn’t uncommon. As wood changes humidity and temperature it moves at different rates than the frets in the fingerboard. These different movements can cause a neck to become out of alignment which often results in fret buzz.
Oftentimes, the fix is a simple setup. A qualified guitar tech will be able to determine in minutes what is going on and how much work is needed if you are experiencing fret buzz.
Just to reiterate and beat this point into the ground, make sure you have a fresh set of strings on your guitar before you start looking for fret issues. A bad string can sound like a low or high fret. As the coils of a string start to unwind they can produce all sorts of nasty metallic overtones. You could waste a lot of money by taking your guitar to a tech when all that was needed was a string change. Always start there.
#5 Make Sure The Nut Is Slotted Properly
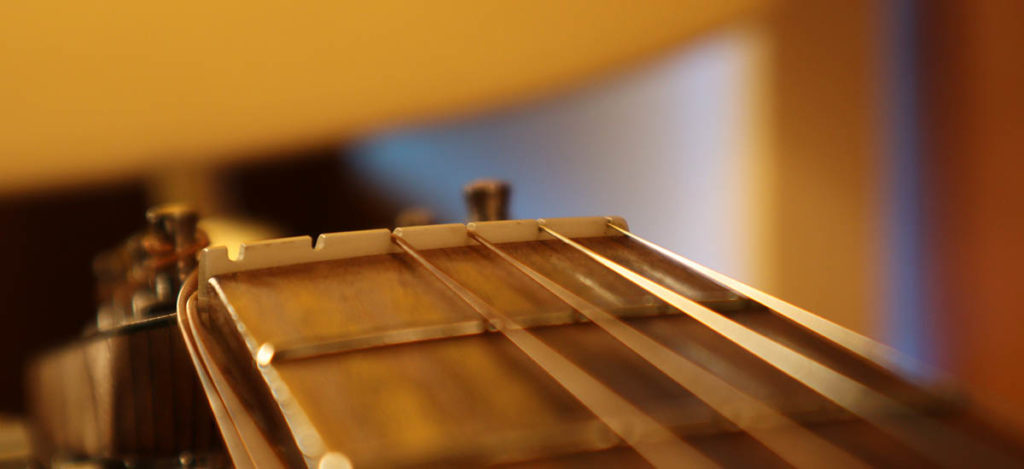
How do you know if you have nut problems on your acoustic guitar? No this isn’t the setup to a bad joke. Play closed, barre chords that don’t utilize any open strings. Does the sound of the guitar get better? If that’s the case then you might be having some issues with your nut.
The nut is the piece of material that the strings run over on their way to the tuners that are mounted on the headstock. Most guitar nuts have slots cut into them which the strings run through. It’s up to the nut to provide a proper touch on the string that is just strong enough to provide a clean, clear break for the string but also light enough that the string isn’t choked or odd harmonics aren’t added to the strings vibration. (I saw most nuts act this way because of the fabled zero fret which in essence pulls the nut out of the equation, using it only directing the strings to the tuners.
The most common nut issue that I often see is a nut slot that isn’t wide enough, or has worn into a “V” shape which causes pinching on the sides of the string. This pinching muffles what should be the clear tone of the open string, and can also induce weird harmonics that sound sharp and biting. A string slot should be a “U” shape where the radius of the bottom of the U is that (or close to it) of the string.
Nut work isn’t particularly difficult, but because you’re taking material away with a nut file, you should probably know how to put material back or cut and reslot a new nut. While it may be tempting to take your guitar to a tech to do this, it can be very rewarding to learn how to do this yourself. Nut slot tools are not too expensive, and the repair work itself not too difficult.
However, slotting a nut can certainly go south so make sure you’ve got a backup plan. And there’s no shame in raising the white flag and bringing your guitar into the shop after you’ve had a crack at it.
At any rate, an improperly cut or worn out nut can cause strange harmonics, buzzing, muffling, intonation and tuning issues. A properly cut nut will make your acoustic guitar sound better.
#6 Make Sure The Saddle Is Seated Properly
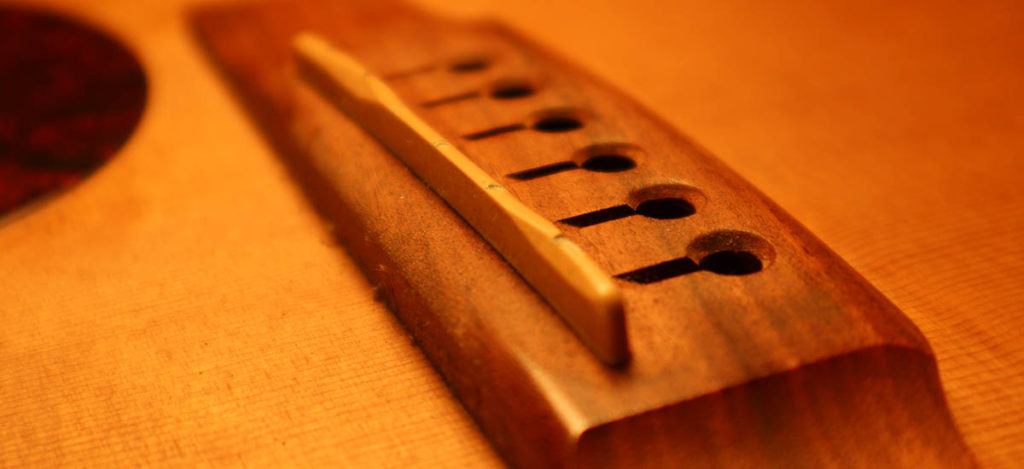
Now on the other end of the guitar we have the saddle and all of the associated problems that can come with that. Similar to the nut, the guitar strings break their plane over this and are secured down into the body of the guitar in the bridge. If there is something incorrect with where and how the saddle touches the string, then all types of strange sounds and problems can occur.
Unlike the nut, while the top of the saddle is easy to inspect to determine if there is too much wear, how the saddle sits in the bridge saddle slot makes a big difference on the tone of the guitar and is often overlooked.
First, loosen the guitar strings and pull them out of the way to the side. Now take a close look at the top of the saddle where the strings run over it and into the bridge. There might be very small divots from the wear of the string, but these should be fairly insignificant. If these divots are becoming too deep then you’ll start encountering issues, and this is a sign that you should replace the saddle. Read on to the next tip for that.
Now pull the saddle out of the bridge slot. This should be accomplished with just your fingers. The saddle should be tight, but easy to pull out.
If a saddle is too loose in the saddle slot then you will have buzzing where the saddle contacts the bridge, improper contact with the bottom of the saddle to the bridge, and inconsistent placement of the saddle top resulting in intonation issues.
If a saddle is too tight then you’ll have tone issues and your acoustic guitar could sound dead and lifeless.
Don’t be surprised if when you pull the saddle out, you see little strips of plastic or paper. These are shims used to raise the height of the saddle. While these are incredibly common, their use will have an impact on the overall tone of the guitar. Less take a look as to why.
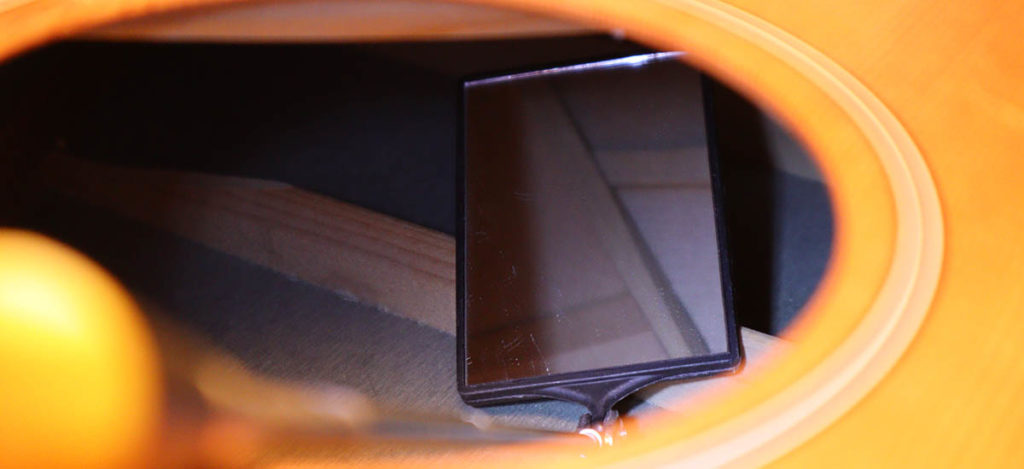
One of the most important physical connections in the whole guitar is the bottom of the saddle to the top of the bridge saddle slot. All of the downward tension of the strings which translates string vibration into the vibration of the top of the guitar, happens in that tiny amount of space. In fact, on my Martin with a Fishman onboard pickup system, the bottom of the saddle has a surface area of only 1/3rd of an inch, and it’s only 1/10th of an inch wide. That’s not a whole lot of space to ensure maximum transfer of sound, and means that it’s critical for the bottom of the saddle to be perfectly flat.
That’s not a whole lot of material tasked with such an important job as translating the entire message the strings are trying to communicate. A common problem to see is the bottom of the saddle not being perfectly flat. This is taking a small surface area and making it even smaller. For an acoustic guitar that can mean the difference between a fat, warm tone and a puny, anemic one.
A properly seated and fit acoustic guitar saddle will make a tremendous difference in the overall tone of your guitar.
#7 Replace the Saddle and Nut with Bone or TUSQ
While we’ve been talking about physical issues that can arise from the nut and the saddle, I haven’t mentioned the actual material. I’d be remiss to not throw the tone hounds a bone on this one. And in fact, bone is the defacto material for both nuts and saddles for gaining the best tone out of your acoustic guitar.
TUSQ is a polymer which through a process of high heat and pressure creates a material with high density that incredibly uniform. This means that tone transfer won’t be inhibited by the irregularities that can occur in natural materials like bone.
In fact, these TUSQ nuts and saddles have caught on with high end manufacturers and are used exclusively by some, most notably Taylor Guitars.
While you can get lost and go mad reading forum post after forum post of differing opinions about saddle and nut material, the biggest factor to the sound of the guitar is that they are cut properly and fitted to your specific guitar. Buying an ultra expensive replacement saddle won’t do a lick of good if the bottom isn’t perfectly flat and the sides aren’t trimmed correctly. Again, don’t get hung up on the material, make sure the installation is right.
Guitars that will gain the most from a nut or saddle replacement are those that occupy the lower end of the price ranges. To save money, some manufacturers will use cheap, plastic nuts that wear quicker and sound pretty wimpy compared to a harder nut like TUSQ or bone.
Again, don’t get pulled into the never ending hoopla around saddle and nut materials, just pick a good one and you won’t be disappointed by the upgrade. However, unless it’s done correctly not even a solid gold saddle will save your acoustic from sounding like a locker room trash can on the losers side.
Upgrading the nut and saddle from plastic to bone or TUSQ is a great way to make your acoustic sound better.
#8 Diagnose Your Guitar’s Electronics
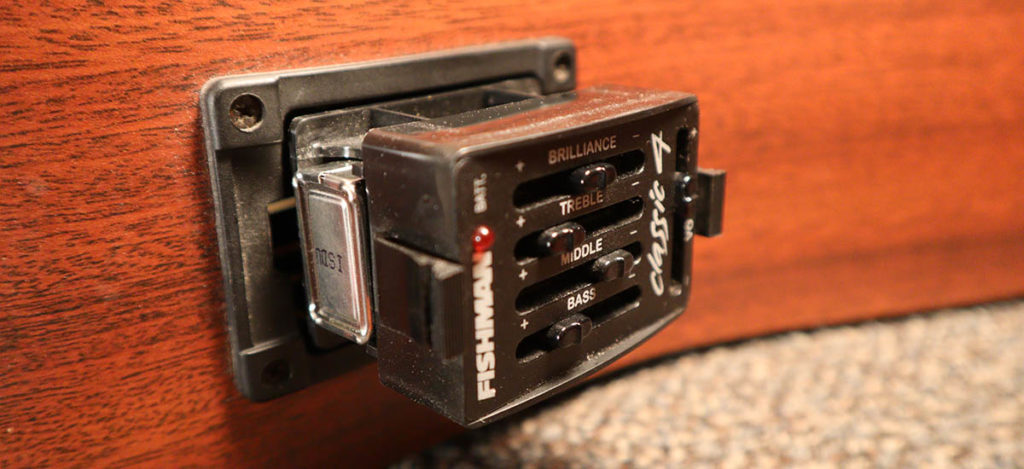
Until now this list has been dealing with purely acoustic ways to make your acoustic guitar sound better. However, if you’re plugging your acoustic into an amp and getting some strange noises, there could be some problems with the onboard preamp, or the pickup element itself.
Before trying to diagnose any acoustic guitar electronics problems, install a fresh battery. This is the electronics equivalent of “always start diagnosing by putting on a fresh set of strings.” There are many weird noises that can be attributed to a dying battery. If the preamp is not getting a full amount of juice from the onboard battery than you can expect poor tone.
Now that we’ve got a new battery in the guitar, make sure that it isn’t the amp or PA system you’re plugged into. Swap amps and cables to make sure that the problem is occurring regardless of what the guitar is plugged into.
Now that we know the problem is with the guitar, start by checking the undersaddle transducer. While there are hundreds of different acoustic guitar pickups out there, these tips apply to about 90% of them. Pull the strings out of the bridge and coil them up out of the way. Now with the guitar plugged in, tap across the saddle with a screwdriver. Listen for an even volume while you tap slowly from side to side. If you’re not getting an even output, most likely the bottom of the saddle isn’t making solid contact with the transducer. In rare circumstances, the transducer itself might be bad and need replacement.
Other acoustic guitar electronics issues can be attributed to a faulty output jack, or stripped pickup wiring.
And speaking of wiring, make sure that all wires are secured in the body of the guitar. Oftentimes the keepers used to hold the pickup wiring will come loose, or allow too much play. This can be a common cause of buzzing as wires reverberate against bracing and top material inside the guitar’s body.
Fixing electronics problems in an acoustic guitar will make your acoustic sound its best when plugged in.
#9 Check For Loose Bracing
One of the major causes for buzzing in an acoustic guitar is bracing and other structural elements that have come loose. First and foremost, make sure that you’re keeping your guitar humidified properly to decrease the likelihood of glued parts coming unglued.
If you think you may be experiencing some buzz or induced harmonics from loose bracing here’s a way to tell. Hold the guitar neck and mute the strings. Now with your free hand gently hit the guitar with the heel of your palm. The tone should be a clear, musical thud that might sound like a hand drum of sorts.
Do this around the entire body of the guitar. Listen closely for the changes from the top of the guitar to the back. On the top of the guitar we might expect more opportunity for loose bracing as this is where most of the bracing is located, and the top is the part of the guitar that is moving the most. Listen closely for buzz or non-musical sounds.
As the tapping gets closer to the edges, listen now for a higher pitch buzz which may come from separation from the top and sides. Some acoustic guitars will use wood or even cloth strips on the sides of the guitar for bracing or aesthetic reasons. These strips can come loose can cause unwanted vibrations inside of the guitar as well.
Finally, with the strings off the guitar, stick a mirror and a light inside the body of the guitar and give it a thorough inspection. Look for any separation or cracks which shouldn’t be there. Putting a light inside of the guitar can be incredibly helpful when looking for cracks that appear very obvious when there’s light shining poking out through a previously invisible crack.
Crack and brace repairs should be done by a professional as these have a major impact on the tone of the guitar. While they’re typically not difficult, specialized tools make a huge difference when getting into hard to reach spots and clamping in tight areas.
#10 Get a Proper Setup

Last on our list of top 10 ways to make your acoustic guitar sound better is making sure that your guitar has been setup properly. While it can be argued that this tip should be number 1 or 2 on this list, all of the preceding steps are things that should be taken care of in a good setup.
A full setup will replace the strings, clean the guitar, adjust the neck if needed, check the nut and saddle, replace the preamp battery if needed, and ensure that there aren’t any structural issues that need to be addressed.
Full setups typically run between $60 and $125 depending on the condition of the guitar and what needs to be done to it. While this may seem like a pretty big expense, especially for lower priced acoustic guitars, it can mean the difference between a guitar that sounds like a wet log, and something that plays great and sounds amazing. A proper setup is an investment in keeping your guitar sounding great and playing well. This will make sure that your acoustic isn’t getting in the way of you making great music. If you have any doubt that your acoustic guitar could be sounding or playing better than it currently is, first try some of these 10 tips, and then take your guitar to a competent repair tech who can get your guitar in tip top shape.